![]()

Arduino is an open source platform based on easy-to-use open source hardware and software. The Arduino language uses C/C++ syntax and includes a set of C/C++ methods which can be called from your sketch code.
A typical Arduino sketch consists of three main sections:
Declarations of global constants, variables and objects:
Used to define any global values, variables, or objects that are used throughout the sketch.
The setup() method:
This method is called once when the sketch is started (whenever the device is powered on or when reset button is pushed ).It is used for setup and initialization.
The loop() method:
This method contains the core functionality of the sketch. It is called consecutively while the sketch is running.
I will illustrate each part of the code structure of the sketch below.
 Global constants, variables and objects
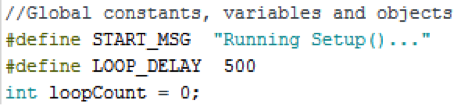
Here, two constants are defined (using the preprocessor directive #define). One of them defines the message which will be displayed at startup and the other defines the effective frequency that the loop() method will run at. Defining constants in this way allows for easy modification of these values. This is particularly true in cases where the constants are referenced multiple times throughout a sketch. We also declare a global variable, loopCount of type int and initialize it to 0.
Setup()

Here we first open the serial connection using the method Serial.begin(). We then send a message to the serial monitor using the Serial.println() method, passing it the string constant START_MSG as we defined above.
Loop()

Here we increment the value stored in loopCount using the ‘++’operator. We then display a message which shows how many times the loop() method has been called so far. Finally we call the delay() method which only returns after the specified number of milliseconds have elapsed. This effectively controls the execution frequency of the loop() method.
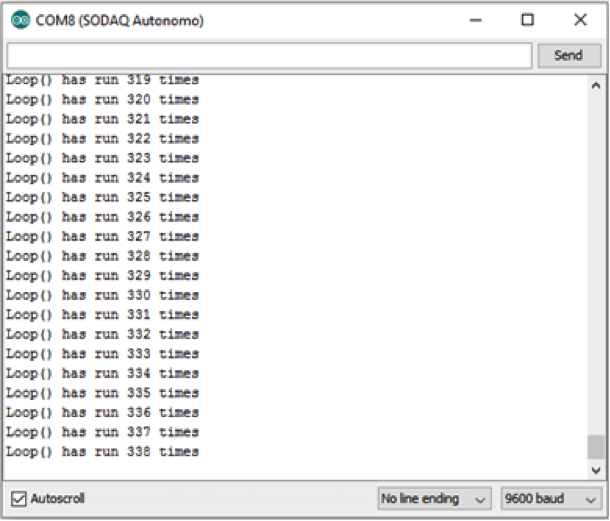
Serial Monitor
If you load the sketch onto the microcontroller (e.g. Arduino) board and then open the Serial Monitor (by pressing Shift+M) you should see output that looks similar to this:
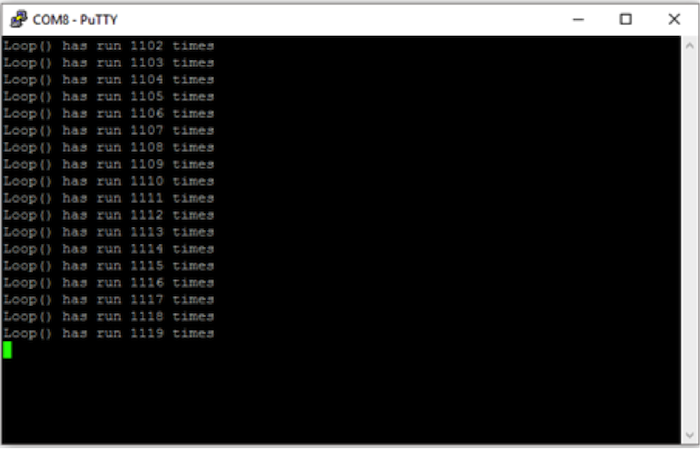
We can use PUTTY software as an alternative way to view Serial Monitor, (Choose Serial and Type the COM corresponding to your Arduino board)

 While loop function for the Serial Monitor
You can make your sketch wait for the serial monitor to be opened by adding the following code to the start of your setup() method:
void setup()
{
// Wait for SerialUSB to open
while (!Serial);
Serial.begin(9600);
Serial.println(“Serial Monitor is opened”);
}
However, this “while loop” in setup method has a drawback that it will stop the sketch from proceeding unless the Serial connection is opened, which is not practical if we are using an external battery to power Autonomo. Autonomo is a solar-powered and Arduino-compatible development board from SODAQ, an open source hardware startup based in the Netherlands. Modifying the while loop function by adding a timeout will be the ideal way to handle that situation.
void setup()
{
// Code will stop in the while loop until Serial monitor is opened or the 10 seconds is over
while ((!Serial) && (millis() < 10000));
Serial.begin(9600);
Serial.println(“Serial Monitor is opened”);
}
 How To Make Parking Assist Car Sensors
 An Intro to: CMUcam5 Pixy Vision Camera Sensor
 Drone Data X: Life-changing drone gadgets
 Step By Step Guide To Your First Project With Arduino
 Low Power Arduino Hack Guide #2: Energy Optimization Design Methods
 Create Your First Sketch and Learn More About the Programming Language


