![]()
IoT childproof lock with the ESP82
If you are familiar with the tech world, you surely heard the term IoT (Internet of Things) already. The concept is to connect each and every device to the internet enabling them to communicate between each other, and enabling you to communicate with them. One of the groundbreaking tools for this is the ESP8266 serial to Wi-Fi chip. Today we are going to build a childproof lock with this chip by reading an Arduino’s mind. I call it a childproof lock, but you can use it for anything else that you want to lock, and only open for certain occasions. For example to keep your roommates (or yourself) away from those tempting cookies in the fridge.
Today’s recipe:
This code is available on https://github.com/gasparnori/iot_lock
Wiring the ESP8266 for programming
This chip has a lot of advantages and disadvantages. It is low-cost, relatively simple, and extremely versatile. However, there can be many pitfalls when using this chip. This module with on-board level shifters and switches, might help you to avoid many of these problems, but keep in mind a few more things:

Figure 1: Block diagram of the setup for programming
Communicating with the ESP
So, now that you are connected, let’s see what your chip has to say. There are several Arduino serial communication tools available, but I’ve found ESPlorer to be the best. Once you download it, just simply run the ESPlorer.jar file. Set your port, and the communication speed (baud rate). Usually it’s 115200, but maybe some devices come with different speed, so if 115200 doesn’t work, just keep trying with different values. First, in order to check if the communication is working, press the reset button. If you see a welcome message, you are good to go. Try a few commands in the top left corner, like a simple AT, or connect to your local Wi-Fi network. Now we are ready to program the module.

Figure 2: ESPlorer
Programming the ESP8266
There are two ways to control the chip. It can be controlled from the Arduino board with simple AT commands via the Serial port (this is what you’ve just tried), or an even simpler way: Uploading the code directly to the chip. In this tutorial, we are going to use the second option. Open the Arduino IDE, and go to Tools–>Board–>Board Manager. Try to find the ESP board, and install it.
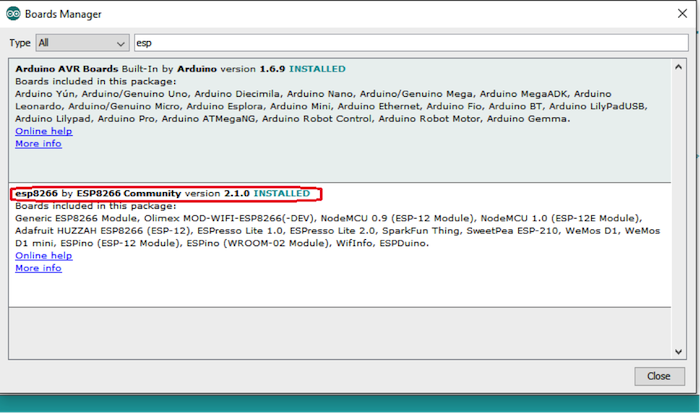
Figure 3: Board Manager
Open a new sketch, go to Tools–>Board and choose your ESP module. Also, make sure to choose the right port in Tools–>Port.

Figure 4: Choosing the port and the board
Now, copy the code below into your sketch, turn your chip into programming mode, press a reset, and start programming. After the code is uploaded, turn it back to “uart mode,” press another reset, open the ESPlorer again, and see what the module sends back. If everything worked fine, you should see two messages saying which Wi-Fi you are connected to, and what your IP address is. Open the given IP address in a browser and you should be seeing this:

Figure 5: Try clicking on the open button
|
1 2 3 4 5 6 7 8 9 10 11 12 13 14 15 16 17 18 19 20 21 22 23 24 25 26 27 28 29 30 31 32 33 34 35 36 37 38 39 40 41 42 43 44 45 46 47 48 49 50 51 52 53 54 55 56 57 58 59 60 61 62 63 64 65 66 67 68 69 70 71 72 73 74 75 76 77 78 79 80 81 82 83 |
#include <ESP8266WiFi.h> #include <ESP8266WebServer.h> //Your ssid and password const char* ssid = "...."; const char* password = "....."; ESP8266WebServer server(80); //This form will be sent to your browser, when the device is locked String form_closed = "<html>" "<head>" "</head>" "<body>" "<center>" "<img width='200px' src='http://www.endlessicons.com/wp-content/uploads/2012/12/lock-icon-614x460.png'>" "<form action='msg'> <p>Do you really need that chocolate?</p>" "<select name='msg'>" "<option value='open'>Yesssssss</option>" "<option value='close'>No, I continue my diet...</option>" "</select>" "<input type='submit' value='Open'></form>" "</center>" "</body>" "</html>"; //this form will be sent to your browser, when the device is open //there is a redirect link in the html to the main page String form_open = "<html>" "<head>" "<meta http-equiv='refresh' content='3;url=/' />" "</head>" "<body>" "<center>" "<h1>Voillaaaa </h1>" "<img width='400px' src='http://www.clipartreview.com/_images_300/A_refrigerator_with_an_open_door_100429-171689-937009.jpg'>" "</center>" "</body>" "</html>"; void handleMessage(){ String state= server.arg("msg"); Serial.println(state); if(state=="close"){ server.send(200, "text/html", form_closed); } else{ server.send(200, "text/html", form_open); //after 3 seconds closes back either way delay(3000); Serial.println("close"); } } void setup(void){ //open Serial port Serial.begin(115200); //open Wifi connection WiFi.begin(ssid, password); Serial.println("Serial started..."); // Wait for connection while (WiFi.status() != WL_CONNECTED) { delay(500); Serial.print("."); } Serial.println(""); Serial.print("Wifi connected to "); Serial.println(ssid); Serial.print("IP address: "); Serial.println(WiFi.localIP()); //handling the form itself server.on("/msg", handleMessage); //handling the main site server.on("/", [](){ server.send(200, "text/html", form_closed); }); //handling wrong url server.onNotFound([](){ server.send(404, "text/plain", "File Not Foundnn"); }); server.begin(); Serial.println("HTTP server started"); } void loop(void){ server.handleClient(); } |
When you open the website, you see a main html page. If you want to open the childproof lock, the website redirects you to the “/msg?msg=open” or to the “/msg?msg=close” URL. On this URL you see another html page for 3 seconds and then it redirects back to the first one. Luckily, most of the redirection is being done in the html code, the server only need to associate each possible URL’s with the html sites to return, which are the form_closed and form_open strings. In order to associate the html with the URL’s, we use the server.on(url, handler). The most important communication happens in the handleMessage function. The server reads the msg argument from the URL, and sends it out on the serial port as a command to open or close the childproof lock.
If everything worked fine, we are ready to connect it to a real Arduino device.
Arduino setup
From the Arduino’s side we are using a very simple setup. While the solenoid could work on up to 12 Volts, right now for this application the 5V, and the current provided by the Arduino’s output pin is enough to keep the magnet working. (However, if you want a stronger magnet, you can easily improve this solution with the help of a transistor or a relay). So, remove the USB converter, and connect the serial ports and the ground together. Again, supply the Vin from the regulator to both devices.
Important to keep in mind:
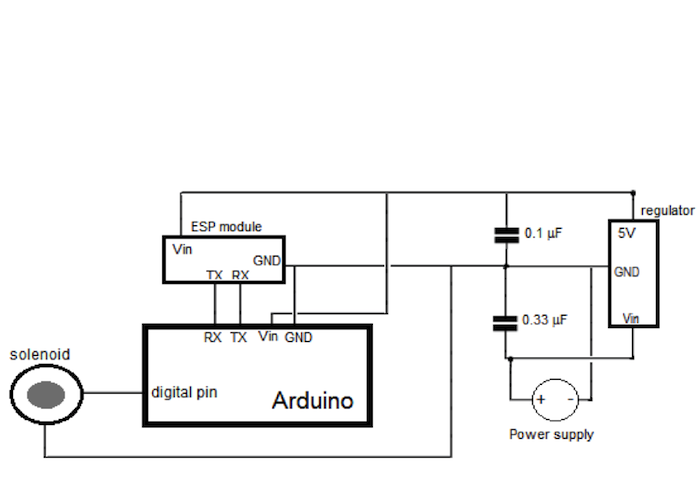
Figure 6: Arduino setup
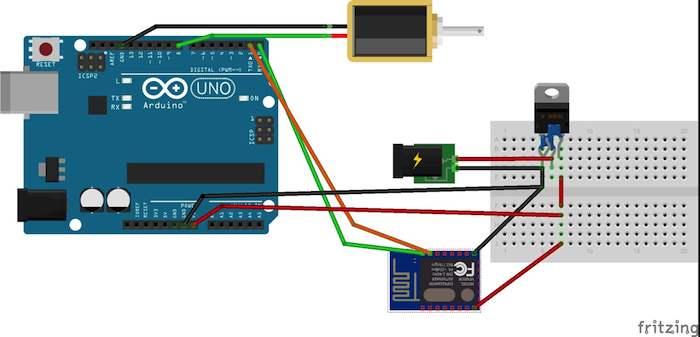
Figure 7: Completed Circuit diagram
|
1 2 3 4 5 6 7 8 9 10 11 12 13 14 15 16 17 18 |
int lock=8; void setup() { pinMode(lock, OUTPUT); digitalWrite(lock, HIGH); Serial.begin(115200); } void loop() { while (!Serial.available()) {}; //reading the answer to a string String a= Serial.readString(); if (a=="openrn") { digitalWrite(lock, LOW); }; if (a=="closern") { digitalWrite(lock, HIGH); }; } |
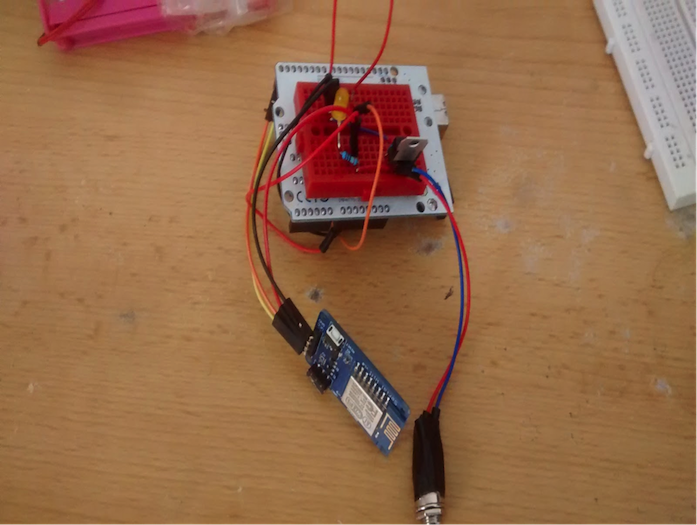

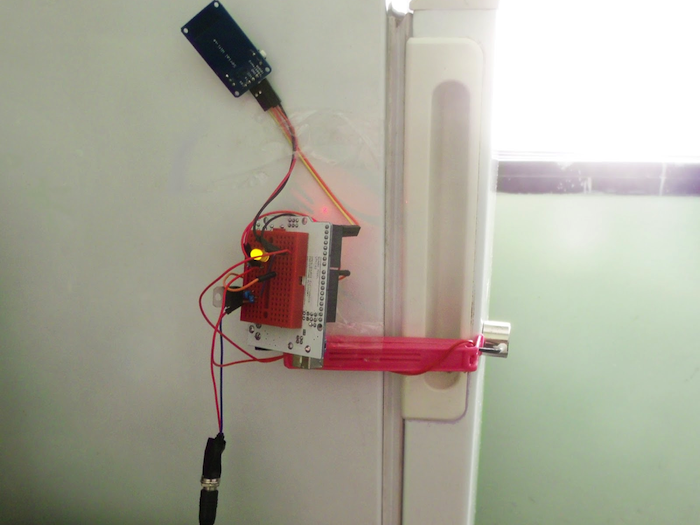
Figure 9: A finished lock
As for the lock, I’ve used a plastic rod to stabilize the solenoid and a simple coin to have something magnetic to hold the childproof lock when it’s on. If you use it on your refrigerator or another metal door, that might not be necessary.
Summary
So, here we created a working IoT childproof lock using a small solenoid and the ESP8266 module. The ESP module runs as a server, providing access to lock through a local IP address. The childproof lock can be turned on and off through clicking on a button in a website that is available to any device connected to the same Wi-Fi as the ESP connects to.


