logo-mobile

ROHM

ROHM
Menu
  • Arduino –
  • Raspberry Pi –
  • Trending –
  • Others –
  • About –
  • Contact –

Arduino

How To Shrink Your Projects For Arduino

Rabindranath Andujar
Published by Rabindranath Andujar at May 28, 2016
Categories
  • Arduino
Tags
  • Arduino
projects for arduino

Ever since I started making projects for Arduino, I’ve had a desire to shrink them down to a single, small circuit board. One of my former projects, a Smart bike lighting was made on Arduino UNO, which limits the project’s success in terms of optimal size. For that purpose, I will introduce multiple ways to shrink your overall project by using different micro-controllers that run on the same Arduino language.

projects for arduino

Alternative Microcontrollers

Arduino Nano

The Arduino Nano is a small, complete, and breadboard-friendly board based on the ATmega328 (Arduino Nano 3.x) or ATmega168 (Arduino Nano 2.x). It has more or less the same functionality of the Arduino Uno, but in a different package. It lacks only a DC power jack, and works with a Mini-B USB cable instead of a standard one. It comes with 6 PWM I/O from the total of 14 digitals I/O, 8 analog inputs, 16Mhz clock speed and 32kB of flash memory. This is a great alternative when making projects for Arduino that are size restrictive.

Remember to change the board in your Arduino software (IDE)

projects for arduino

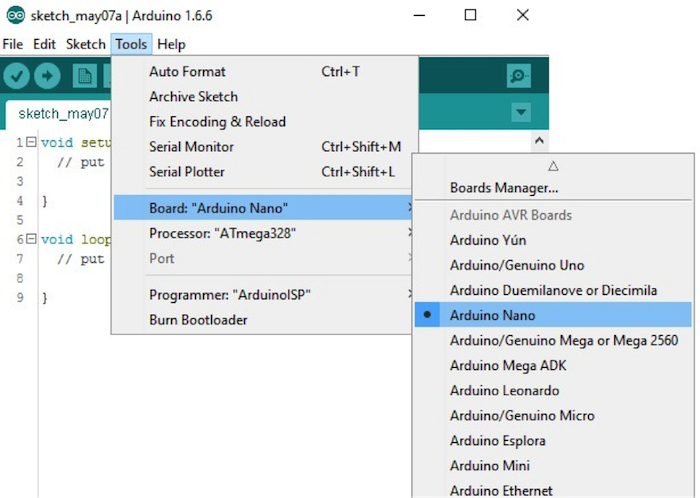
Figure 2 : Setting the board on Arduino IDE

projects for arduino

projects for arduino

Arduino Pro Mini

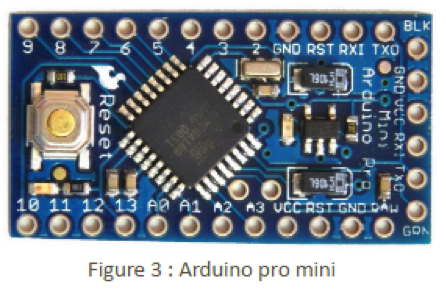
The Arduino Pro Mini is a microcontroller board based on the ATmega328. It has 14 digital input/output pins (of which 6 can be used as PWM outputs), 6 analog inputs, an on-board resonator, a reset button, and holes for mounting pin headers.

There are two version of the Pro Mini. One runs at 3.3V and 8 MHz, the other at 5V and 16 MHz. A six pin header can be connected to an FTDI cable or Sparkfun breakout board to provide USB power and communication to the board.

As you may see, Arduino Pro Mini has no USB; so programming projects for Arduino here is a bit different than the UNO or NANO.

There are two ways available for programming Arduino Pro Mini:

    • Very carefully remove the Atmel IC from the Arduino UNO, the pins are very fragile so be careful
    • Check your model for the Arduino pro mini version (i.e. 3.3v or 5v).
    • Connect UNO’s pin 5v (or 3.3v) to mini’s main VCC pin:Using any FTDI chip which already has an embedded USB, so you can connect to your PC and upload your sketch normally.
      projects for arduino

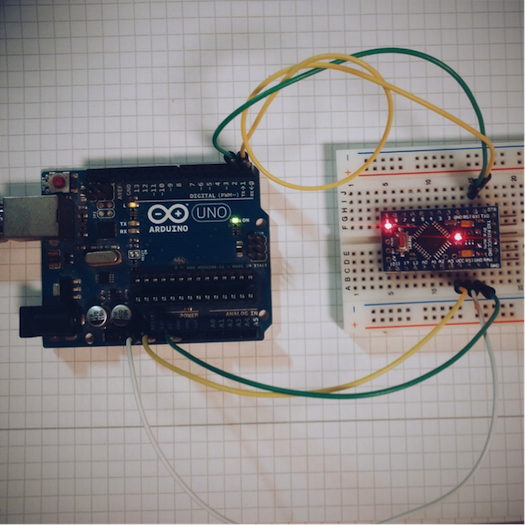
      Figure 4: Arduino pro mini connection with FTDI board

      As always change your Arduino software to your current connected board

      projects for arduino

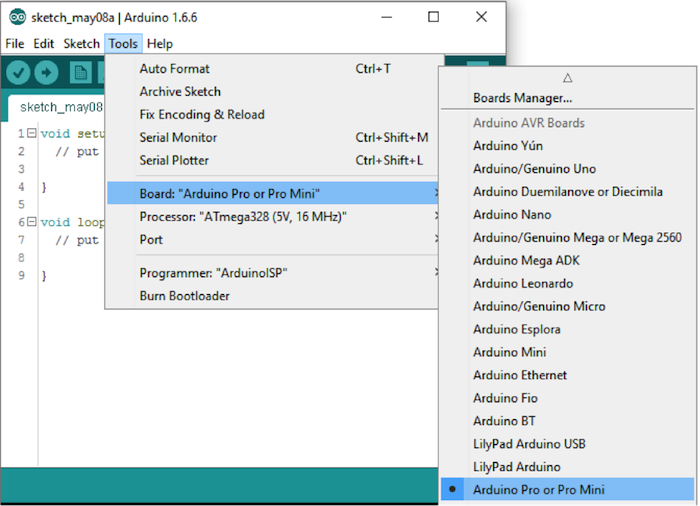
      Figure 5: Setting the board on Arduino IDE

      Choose the corresponding processor with corresponding clock frequency.

      1. Using Other Arduino version as an ISP device to upload the sketch to the Arduino Pro mini
        UNO’s pin GND to mini’s main GND
        UNO’s pin RX to mini’s RXI
        UNO’s pin TX to mini’s TX0
        UNO’s RESET to mini’s RST

projects for arduino

projects for arduino

Attiny85

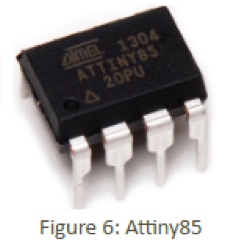
If you have simple projects for Arduino that use only a few pins, you might be able to shrink it down to a single 8-pin ATtiny chip.

How to program attiny using Arduino Uno Board:

  • Download the hardware support files for Attiny85
  • Move the files after you uncompressed it  into the hardware folder of Arduino folder
  • Open Arduino IDE choose Examples-> Arduino ISP -> ISP
  • Upload it to your Arduino UNO board
  • Connect attiny to Uno as below
projects for arduino

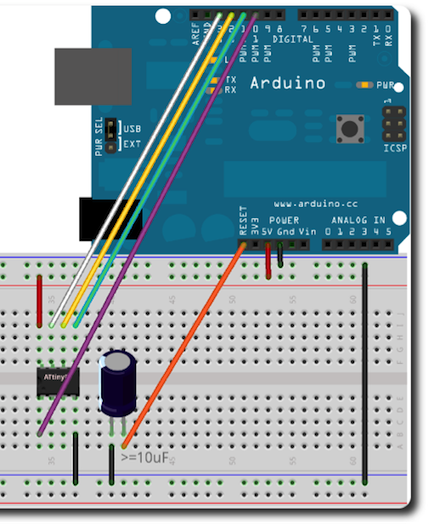
Figure 7: Programming Attiny with an Arduino Uno board

projects for arduino

Figure 8: Attiny85 pins

  • Write your code that you want to upload on attiny (Don’t upload yet)
  • Choose the attiny board from Tools -> Board -> Attiny85 (if you don’t find it, check the hardware folder in the folder location of the Arduino software above)
  • Choose Programmer -> Arduino as ISP
  • Then upload your code from Sketch -> Upload using a programmer

projects for arduino

Arduino Micro

Arduino Micro packs all of the power of the Arduino Leonardo in a smaller size. It’s an 8-bit microcontroller, with 32K of flash, and 2.5K of RAM. You can program it directly via the USB micro connector. It’s based on the ATmega32u4 processor.

projects for arduino

Figure 10: Teensy v2.0

Teensy

The Teensy is a complete USB-based microcontroller development system, in a very small footprint, capable of implementing many types of projects for Arduino. It’s available as an 8bit or 32bit board. It’s Arduino compatible and can be programmed by USB easily just like any Arduino board.

Particle family

This is one of my favorite microcontrollers on the market right now. Here are some of its best features:

  • Powerful STM32 ARM Cortex M3 microcontroller
  • Broadcom BCM43362 Wi-Fi chip
  • 18 mixed GPIO pins and a web-based IDE (similar to Arduino IDE)
  • Can be programmed by a mobile app with absolutely no connection to hardware
  • Small size and low cost

projects for arduino

By the time you read this there will be even more new devices in the market.

Rabindranath Andujar
Rab holds PhD in Computational Physics and has been a dedicated researcher in the areas involving computing, automation and complex systems. Rab also has experience in electronics, robotics and digital manufacturing.

Check us out on Social Media

  • Facebook
  • Twitter

Recommended Posts

  • A Smart Bike Lighting System Using ArduinoA Smart Bike Lighting System Using Arduino
  • Step By Step Guide To Your First Project With ArduinoStep By Step Guide To Your First Project With Arduino
  • Arduino Bluetooth Gloves Part 1 – BasicsArduino Bluetooth Gloves Part 1 – Basics
  • Arduino Bluetooth Gloves Part 2 – Putting Everything TogetherArduino Bluetooth Gloves Part 2 – Putting Everything Together
  • ESP-WROOM-02 Wifi Setup Guide – AT CommandsESP-WROOM-02 Wifi Setup Guide – AT Commands
  • Digital Signal Processing Part 4 – Creating GUI in MATLABDigital Signal Processing Part 4 – Creating GUI in MATLAB
Receive update on new postsPrivacy Policy

Recommended Tutorials

  • How to integrate an RFID module with Raspberry Pi How to integrate an RFID module with Raspberry Pi
  • How to Use the NRF24l01+ Module with Arduino How to Use the NRF24l01+ Module with Arduino
  • How to Run Arduino Sketches on Raspberry Pi How to Run Arduino Sketches on Raspberry Pi
  • Setting Up Raspberry Pi as a Home Media Server Setting Up Raspberry Pi as a Home Media Server

Recommended Trends

  • SewBot Is Revolutionizing the Clothing Manufacturing Industry SewBot Is Revolutionizing the Clothing Manufacturing Industry
  • All About The Sumo Robot Competition And Technology All About The Sumo Robot Competition And Technology
  • 5 Interesting Tips to Calculating the Forward Kinematics of a Robot 5 Interesting Tips to Calculating the Forward Kinematics of a Robot
  • Go Inside the Drones That Are Changing Food Delivery Go Inside the Drones That Are Changing Food Delivery
Menu
  • Arduino –
    Arduino Beginner’s Guide
  • Raspberry Pi –
    Raspberry Pi Beginner's Guide
  • Trending –
    Updates on New Technologies
  • Others –
    Interviews / Events / Others

Check us out on Social Media

  • Facebook
  • Twitter
  • About
  • Company
  • Privacy Policy
  • Terms of Service
  • Contact
  • Japanese
  • 简体中文
  • 繁體中文
Don’t Forget to Follow Us!
© Copyright 2016-2023. Device Plus - Powered by ROHM
© 2023 Device Plus. All Rights Reserved. Muffin group

istanbul escort istanbul escort istanbul escort