![]()
Now, let’s create a program to light up the LED string. The sample code below is based on
Adafruit_NeoPixel code example.
Sample program of LED strip
|
1 2 3 4 5 6 7 8 9 10 11 12 13 14 15 16 17 18 19 20 21 22 23 24 25 26 27 28 29 30 31 32 33 34 35 36 |
#include <Adafruit_NeoPixel.h> #define PIN 6 //pin number of the signal terminal #define LED_NUM 50 //number of LEDs Adafruit_NeoPixel ledtape = Adafruit_NeoPixel(LED_NUM, PIN, NEO_GRB + NEO_KHZ800); //if the control IC of the LED tape used is WS2812, the third parameter is NEO_KHZ800 and if WS2811 then NEO_KHZ400 void setup() { ledtape.begin(); ledtape.show(); //reflects once in all OFF state } void loop() { uint16_t i, j; for(j=0; j <256; j++) { for(i=0; i < ledtape.numPixels(); i++) { ledtape.setPixelColor(i, rotateColor((((i) * 256 / ledtape.numPixels()) + j) & 255)); } ledtape.show(); delay(20); } } //RGB color transition function uint32_t rotateColor(byte WheelPos) { if(WheelPos < 85) { return ledtape.Color(WheelPos * 3, 255 - WheelPos * 3, 0); } else if(WheelPos < 170) { WheelPos -= 85; return ledtape.Color(255 - WheelPos * 3, 0, WheelPos * 3); } else { WheelPos -= 170; return ledtape.Color(0, WheelPos * 3, 255 - WheelPos * 3); } } |
If the LED tape is connected and the program runs correctly, you will see the LEDs lighting up.
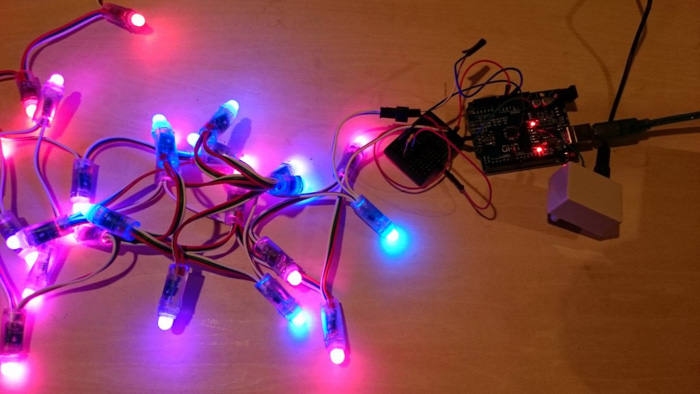
Figure 7. LED tape lighting
Also, if you change the program a little bit, it’s also possible to light the LEDs one after another, one by one.
Program to light the LEDs one at a time
|
1 2 3 4 5 6 7 8 9 10 11 12 13 14 15 16 17 18 19 20 21 22 23 24 25 26 27 28 29 30 31 32 33 34 35 36 37 |
#include <Adafruit_NeoPixel.h> #define PIN 6 //pin number of the signal terminal #define LED_NUM 50 //number of LEDs Adafruit_NeoPixel ledtape = Adafruit_NeoPixel(LED_NUM, PIN, NEO_GRB + NEO_KHZ800); //if the control IC of the LED tape used is WS2812, the third parameter is NEO_KHZ800 and if WS2811 then NEO_KHZ400 void setup() { ledtape.begin(); ledtape.show(); //reflects once in all OFF state } void loop() { uint16_t i, j; //Set the state of all colors of the LED in minutes and light in show for(i=0; i < ledtape.numPixels(); i++) { ledtape.setPixelColor(i, Wheel((((i) * 256 / ledtape.numPixels()) + j) & 255)); ledtape.show(); ledtape.setPixelColor(i, ledtape.Color(0,0,0)); delay(20); ledtape.show(); } } //RGB color transition function uint32_t rotateColor(byte WheelPos) { if(WheelPos < 85) { return ledtape.Color(WheelPos * 3, 255 - WheelPos * 3, 0); } else if(WheelPos < 170) { WheelPos -= 85; return ledtape.Color(255 - WheelPos * 3, 0, WheelPos * 3); } else { WheelPos -= 170; return ledtape.Color(0, WheelPos * 3, 255 - WheelPos * 3); } } |
You can decorate your indoor or outdoor spaces using the LED string we just programmed. (Even though Halloween has just passed) when set up with jack-o’-lantern, you feel it’s Halloween all over again!
Today, we learned the basics of how to use LED strip/string Next time, we will be using a sensor from ROHM Sensor Evaluation Kit to create a device that manipulates LED string based on the sensor input values. The holidays will be here before you know it! Add some holiday spirit to your home using these cool LED strip/string projects!
 Let’s Make Arduino LED Holiday Lighting using Proximity Sensor
 Make an LED Arduino Christmas Tree with ROHM Sensor Kit
 Raspberry Pi WebIOPi IOT – Full-Color LED Christmas Decoration
 Using ESP-WROOM-02 Wifi Module As Arduino MCU
 Step By Step Guide To Your First Project With Arduino
 Smart Robotic Arm – Part 1: Mechanics and Wiring


