logo-mobile

ROHM

ROHM
Menu
  • Arduino –
  • Raspberry Pi –
  • Trending –
  • Others –
  • About –
  • Contact –

Arduino

A Smart Bike Lighting System Using Arduino

Rabindranath Andujar
Published by Rabindranath Andujar at May 19, 2016
Categories
  • Arduino
Tags
  • Arduino
Arduino bike lighting

Arduino bike lighting

How To Make A Smart Arduino Bike Lighting System

This Arduino bike lighting project upgrades your bike’s light and takes it to the next level so that the backlight of the bike automatically notifies others when you are turning.

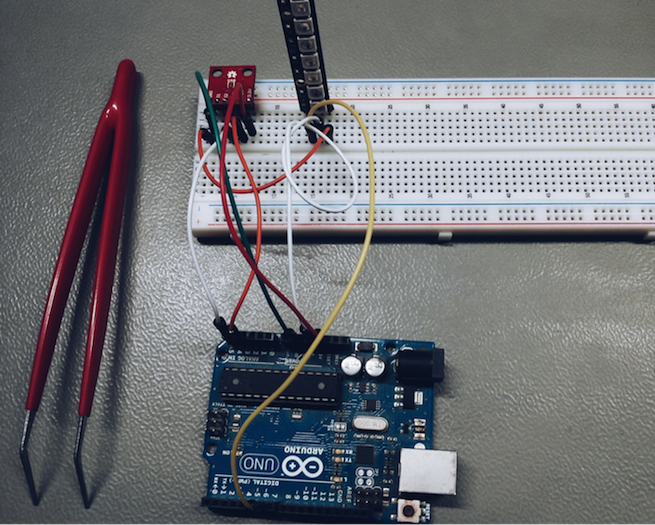
We used Arduino UNO as our main microcontroller (use Nano or Pro mini to shrink the size if needed), Accelerometer to detect the 3 axis directions and Neopixel to blink the LEDs in the corresponding direction of movement.

Description

  • Blinks toward the direction you are turning in green (e.g. Turning to the left or the right)
  • Turns to red when you are riding forward.

Components used

Hardware components:

  1. Arduino Microcontroller (e.g. UNO or Nano, Pro mini)
  2. Accelerometer (e.g. Sparkfun MMA845Q)
  3. Adafruit Neopixel stick (or you can build one on your own using ws2812b LEDs)
  4. Resistors (e.g 330 ohm)

Software components:

Arduino IDE

Milestones

Read Arduino Basics (Level: Beginner)

1. Define the range of the results out of the accelerometer
This step is where you should find out the X, Y and Z direction of left and right. Take note of the position of the accelerometer while testing, since you have to place the sensor in the same position later on the bike.

You can simply upload the .ino sketch to your Arduino and open your Serial monitor and notice the flow of numbers of the 3 axis (X, Y and Z ). Make sure that the baud rate is set to 9600 so you can see the actual results.

arduino bike lighting

These numbers correspond to X, Y and Z respectively, experiment with the change of numbers when you turn right and left and when you keep your Arduino bike lighting straight forward.

arduino bike lighting

These were my values when I connected a pullup resistor of 330 ohm on pins A4 and A5; you will get different values if you use other resistor values.

2. Create your own Arduino bike lighting pattern with the addressable LEDs
One of the advantage of these pixels “WS2812b“ is that they are addressable which gives you a wide range of getting creative ideas of lighting. I’ll discuss how to build your own pixelstick using ws2812b LEDs in a follow up post.

arduino bike lighting

I have only chosen 2 colors (green and red) for my Arduino bike lighting system, but you can add more colors to your pattern by mixing the value of RGB as shown here.

arduino bike lighting

arduino bike lighting

Get creative with it!!

3. Connect the two codes together

Simply connect the codes together, identifying which pattern to start with for each direction.

Hardware connections

arduino bike lighting

Sketch

  • Download the Arduino sketches from https://github.com/formus14/Smart-Bike
  • Add ‘Adafruit_NeoPixel’ and ‘SparkFun_MMA8452Q’ source and header files in the library folder of Arduino.
  • Upload the ino file to your Arduino

arduino bike lighting


Rabindranath Andujar
Rab holds PhD in Computational Physics and has been a dedicated researcher in the areas involving computing, automation and complex systems. Rab also has experience in electronics, robotics and digital manufacturing.

Check us out on Social Media

  • Facebook
  • Twitter

Recommended Posts

  • How To Shrink Your Projects For ArduinoHow To Shrink Your Projects For Arduino
  • DIY Arduino Home Security System using ROHM Sensor Kit Part 2 – Cayenne SetupDIY Arduino Home Security System using ROHM Sensor Kit Part 2 – Cayenne Setup
  • Make a Smart Automatic Pet Feeder with Arduino UnoMake a Smart Automatic Pet Feeder with Arduino Uno
  • How to Build a DIY Drone from Scratch Part 2: Using Arduino Nano as a Flight ControllerHow to Build a DIY Drone from Scratch Part 2: Using Arduino Nano as a Flight Controller
  • ESP8266 Setup Tutorial using ArduinoESP8266 Setup Tutorial using Arduino
  • Arduino Communication Protocols TutorialArduino Communication Protocols Tutorial
Receive update on new postsPrivacy Policy

Recommended Tutorials

  • How to integrate an RFID module with Raspberry Pi How to integrate an RFID module with Raspberry Pi
  • How to Use the NRF24l01+ Module with Arduino How to Use the NRF24l01+ Module with Arduino
  • How to Run Arduino Sketches on Raspberry Pi How to Run Arduino Sketches on Raspberry Pi
  • Setting Up Raspberry Pi as a Home Media Server Setting Up Raspberry Pi as a Home Media Server

Recommended Trends

  • SewBot Is Revolutionizing the Clothing Manufacturing Industry SewBot Is Revolutionizing the Clothing Manufacturing Industry
  • All About The Sumo Robot Competition And Technology All About The Sumo Robot Competition And Technology
  • 5 Interesting Tips to Calculating the Forward Kinematics of a Robot 5 Interesting Tips to Calculating the Forward Kinematics of a Robot
  • Go Inside the Drones That Are Changing Food Delivery Go Inside the Drones That Are Changing Food Delivery
Menu
  • Arduino –
    Arduino Beginner’s Guide
  • Raspberry Pi –
    Raspberry Pi Beginner's Guide
  • Trending –
    Updates on New Technologies
  • Others –
    Interviews / Events / Others

Check us out on Social Media

  • Facebook
  • Twitter
  • About
  • Company
  • Privacy Policy
  • Terms of Service
  • Contact
  • Japanese
  • 简体中文
  • 繁體中文
Don’t Forget to Follow Us!
© Copyright 2016-2023. Device Plus - Powered by ROHM
© 2023 Device Plus. All Rights Reserved. Muffin group

istanbul escort istanbul escort istanbul escort