![]()
The ultrasonic sensor is a neat, versatile sensor that you can add to your Arduino projects. It uses—as its name implies—ultrasonic sounds to detect when an object is nearby and how far away it is. It can be used to enable motion gestures, or to respond when an object enters its path.

Of course, you might be wondering, how exactly does the Arduino ultrasonic sensor work?
To demonstrate how it works, this guide will show you how to put together a simple musical instrument, using the ultrasonic sensor as an input
The ultrasonic sensor we’re looking at today is the HC-SR05, a slightly upgraded 5-pin version of the older HC-SR04. It features two cylindrical modules. One is a transmitter that sends out an ultrasonic signal, and the other is a receiver that catches the signal when it bounces back after hitting an object. By measuring the amount of time it takes for the signal to return, the sensor can calculate how far away an object is.
While other sensors like Passive Infrared motion sensors can perform similar functions, the ultrasonic sensor is particularly useful since it not only allows your project to detect that an object has passed in front of it, but it can distinguish between objects that are closer or farther away.
We’ll use this technique to create a floating musical instrument. Rather than pressing a key on a piano to play a note, this project will let you put an object—such as a stick, or your finger—in front of the sensor. Depending on how far away the object is, a different note will play. It won’t be a perfect recreation of a piano, but it will give you an idea of what you can do with this handy Arduino sound sensor.
To get started, make sure you have the following;
| Arduino Uno |  |
| HC-SR05 Ultrasonic Sensor
HC-SR04 or other ultrasonic sensors can be used, but the pin configuration will need to be modified) |
 |
| Arduino IDE |  |
You’ll also need the below, which are more generic pieces of hardware;
● Speaker: Most simple speaker modules will work, but this project will use this simple mono speaker.
● USB cable
If you haven’t set up the Arduino IDE you can check out our previous guide to get started here.
First, let’s take a look at the code we’re going to upload to the Arduino Uno, so we know what it’s going to do.
void setup() {
pinMode (6,OUTPUT); //Insert HC-SR-05 with VCC in pin 6
pinMode (5, INPUT); // Assign pin 5 to Echo
pinMode (4, OUTPUT);// Assign pin 4 to Trig
pinMode (2,OUTPUT); // Assign pin 2 to GND.
Serial.begin(9600); // This will allow you to read how far away your sensor is later
}
void loop()
{
long duration, cm; // Initialize variables for duration and cm
digitalWrite(6, HIGH); // Power the sensor
digitalWrite(4, LOW); // Clear pulse before sending a 10 microsecond ping,
delayMicroseconds(2);
digitalWrite(4, HIGH);
delayMicroseconds(10);
digitalWrite(4, LOW);
duration = pulseIn(5, HIGH); // Detect pulse length from the Echo pin, measured in microseconds
cm = (duration/2)/29.155; // Divide duration in half (due to round trip), then convert distance to centimeters (1cm per 29.155 microseconds), assign to cm variable
Serial.print(cm); // Print distance in cm to serial monitor
Serial.print(“cm”);
Serial.println();
delay(100); // Delay
int note = 0; // Assign note based on distance, spacing notes per 6cm
if(cm<=48&&cm>42) {
note = 523;
} else if(cm<=42&&cm>36) {
note = 493;
} else if(cm<=36&&cm>30) {
note = 440;
} else if(cm<=30&&cm>24) {
note = 392;
} else if(cm<=24&&cm>18) {
note = 349;
} else if(cm<=18&&cm>12) {
note = 329;
} else if(cm<=12&&cm>6) {
note = 294;
} else if(cm<=6) {
note = 261;
}
if (note == 0) { // If distance isn’t within 48cm, play nothing
noTone(9);
} else {
tone(9, note, 200); // Play assigned note for 200 milliseconds
}
delay(10); // Brief pause
}
You can copy the above code into your IDE, upload it to your Uno, and move on to the next section if you’d like to get it started, but briefly, here are the important parts of the code to understand. First:
digitalWrite(6, HIGH); // Power the sensor
digitalWrite(4, LOW); // Clear pulse before sending a 10 microsecond ping,
delayMicroseconds(2);
digitalWrite(4, HIGH);
delayMicroseconds(10);
digitalWrite(4, LOW);
duration = pulseIn(5, HIGH); // Detect pulse length from the Echo pin, measured in microseconds
cm = (duration/2)/29.155; // Divide duration in half (due to round trip), then convert distance to centimeters (1cm per 29.155 microseconds), assign to cm variable
This section sends out a 40KHz pulse on the Trig pin. This ultrasonic signal will bounce off of any object it hits and return to the receiver. The pulseIn() function then measures how long it takes between the time the pulse leaves the sensor and the time it’s detected by the receiver, measured in microseconds.
That duration is then divided by two, since the signal makes a round trip, traveling to the object and back again. This gives us the number of microseconds it takes a 40KHz sound to travel to the object. Since it takes roughly 29.155 microseconds for sound to travel 1 centimeter, we can divide the remaining number by 29.155. This tells us how far away the object is, measured in centimeters, then assigns that distance value to the cm variable.
The next few lines will print the distance in centimeters to the serial monitor, which is helpful to make sure that the code is working properly and to see how far away your object is while you’re running the program.
The final major relevant portion of code is this:
int note = 0; // Assign note based on distance, spacing notes per 6cm
if(cm<=48&&cm>42) {
note = 523;
} else if(cm<=42&&cm>36) {
note = 493;
} else if(cm<=36&&cm>30) {
note = 440;
} else if(cm<=30&&cm>24) {
note = 392;
} else if(cm<=24&&cm>18) {
note = 349;
} else if(cm<=18&&cm>12) {
note = 329;
} else if(cm<=12&&cm>6) {
note = 294;
} else if(cm<=6) {
note = 261;
}
if (note == 0) { // If distance isn’t within 48cm, play nothing
noTone(9);
} else {
tone(9, note, 200); // Play assigned note for 200 milliseconds
}
This code block will assign a frequency for the speaker to emit based on how far away the object is. This Arduino reference document lists the frequency for a range of musical notes, so we’ll use this as our reference point. The if else statement assigns a frequency to the note variable based on how far away the object is, in increments of 6cm, for one entire octave, giving you eight notes. If no object is detected, the note variable is assigned a value of 0.
In the final section, the tone() function will play the note or, if there’s no object detected within 48cm, the noTone() function will stop the previous tone from playing. There’s one last delay() command before starting the loop over. These delays help prevent the program from rapidly changing notes, since the sensor isn’t super precise.
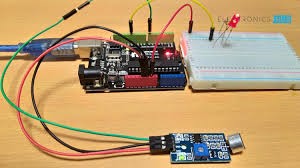
Once you know how the code works, you can upload it to your Arduino Uno, then unplug the device. Now, it’s time to wire it up. We’ve written the code to make this as simple as possible. All you have to do is follow these steps:
● Plug the HC-SR05 sensor into digital pins 2 through 6, with GND plugged into pin 2, and VCC plugged into pin 6. This should result in the sensors facing outwards, away from the Arduino.
● Plug the positive wire on your speaker (usually red) into pin 9.
● Plug the other speaker wire (usually black) into one of the GND pins.
Once all wires are connected, plug in your Arduino and give it around 50cm of empty space in front of the sensors. Now, the fun part. Place your hand or a small stick in front of the sensor and you’ll hear a note coming out of the speaker. The further away you place the object, the higher the note will be.
You can try playing around with the delay() and tone() durations to make the notes sound smoother, or adjust the frequency values to get different notes. The sensor can also be used as an alarm to alert when an object gets within a certain distance, or to send a command to your computer when your hands get within a certain distance.
 How to Build a Motion Activated Light
 How to detect motion in your Arduino with an accelerometer
 Using Arduino with Parts and Sensors – Speakers Part 2
 How to Find Out When Your Plants Need Watering with a Soil Sensor
 Use an Arduino to find out when to turn on your humidifier
 Using Arduino with Parts and Sensors – Photoreflector


