![]()
This tutorial will take you through the steps of building a smart umbrella stand.
This is one of our favorite raspberry pi projects. It uses a RaspberryPi Model B with the GrovePi expansion board from Dexter Industries along with their Ultrasonic sensor, Buzzer, and LED module. We’ll be using a custom Raspbian disk image for this project, running on the latest “jessie” build.
The goal of this tutorial is to demonstrate a working prototype and show you the steps needed to test and revise this design in order to refine and deploy a solution that’s right for you.

HARDWARE
SOFTWARE
TOOLS
There are many steps in the development of a project from concept to deployment.

It seems like I’m always running late in the morning and I never have time to check the weather. I rush out the door and never know if I’ll need an umbrella. So one of my raspberry pi projects I have been planning is to make a smart umbrella stand that will check the weather for me and notify me if it is going to rain.

Using a weather station API developer key, a python script will poll the weather station in my town and return a query result for the % chance of rain. If that result is outside my threshold of tolerance than a LED light will blink on the umbrella stand and give me an audio notification when I pass by, if I need to grab the umbrella before leaving the house.
This prototype uses the GrovePi expansion board from Dexter Industries to manage the RaspberryPi GPIO pins. I like using this expansion board because of it’s plug & play design and the modified Raspbian disk image from Dexter Industries that has a whole host of troubleshooting tools, which come in handy during the testing phase.
Setting up the Disk Image (PC)
Download the 2016.04.25_Dexter_Industries_jessie.zip Disk Image and un-compress it on your hard drive.
Format a 8GB SD Card. I use SD Formatter v4.

Write the downloaded Disk Image to the SD Card. I use Win32 Disk Imager

A. Assembling the Rapberry Pi and GrovePi GPIO Expansion board
1) The GrovePi lines up with the 28 GPIO pins on the Raspberry Pi Model B. It’s a snug fit but with gentle pressure it fits on snug.

Figure 1. RapberryPi and GrovePi GPIO Expansion board (separate)

Figure 2. RapberryPi and GrovePi GPIO Expansion board (combined)
B. Startup the RaspberryPi & Update
1) The Raspberry Pi boots directly into the Dexter Industries GUI.

2) Click on the WiFi Setup icon to connect to you local router and the Internet.
3) Click on the DI Software Update icon to launch.

4) Select GrovePi from the drop down menu and Update in this order:
i) Hardware Firmware
ii) Raspbian
iii) Dexter Software
5) System will ask to reboot upon completion
C. Register with Weather Underground to get a Developer API key
1) Open a web browser and go to the Weather Underground’s website
2) Register as a NEW user
3) Click on the Weather API for Developers tab
4) Generate an API Key (see video)
D. Setup Python Program
1) Open File /home/pi/Desktop/GrovePi/Software/Python/test_script
2) GOTO [Edit] >[Select All] AND [Delete]
3) GOTO [File] >[Save As] /home/pi/Desktop/Documents/umbrella_stand.py
4) COPY this code into the empty file window
5) GOTO LINE 40 and enter YOUR_ZIP_CODE
6) GOTO LINE 44 and enter YOUR_API_KEY
7) FOLLOW the # instructions for further customization or check out the code walkthrough video (see video)
8) [File] [Save]
9) See video for step by step code walkthrough
E. Connect Grove Sensors
1) Connect the Ultrasonic Ranger to D4 connector on the GrovePI Expansion Board
2) Connect the Grove LED to the D7 connector on the GrovePi Expansion Board
3) Connect the Grove Buzzer to the D8 connector on the GrovePi Expansion Board
4) [Run] [Run Module] in the umbrella_stand.py
5) If it’s not raining in your area, you can edit the umbrella_stand.py script zip code for an area where it is
raining (see video)
F. Setup the RaspberryPi to be headless and automatically run the relay program
1) GOTO [Menu] >[Other] >[LXTerminal]
2) ENTER at [pi@dex:~ $] prompt:
sudo crontab -e.
3) If the file doesn’t exist, than create it and add the following line (this is where you should have saved the Python program):
@reboot sudo python /home/pi/Documents/DevicePlus/umbrella_stand.py

4) When the RaspberryPi boots the program should load.
5) Go test your creation on your favorite lamp.

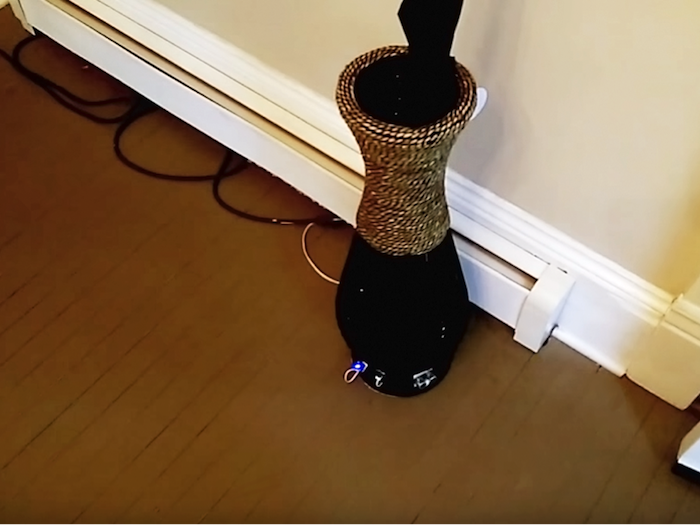
Figure 3. RapberryPi and GrovePi GPIO Expansion board (combined)
I’ve hooked the project to my umbrella stand in the front hall for a practical test.
CONCLUSION
This project was one of the more interesting raspberry pi projects. It got into a level of connectivity and feedback that I want in an ordinarily dumb device. In this fast-paced world we can’t catch everything but if we have a smart umbrella stand, that will certainly help us stay dry.
I hope you enjoyed this tutorial and please send me any modifications you’ve made to this project.


