![]()
This article was translated to English, and was originally published for deviceplus.jp.
An introduction to drones brought to you by Device Plus!
Did you know that small drones that you can make and fly yourself have been gaining a lot of attention these days?
The $50.00 base can be customized with a camera and various sensors, etc. to enjoy flying or racing from a first-person perspective. Micro drones combine the kinds of elements that our cherished Device Plus audience will appreciate.
Drone racing Japan representative (at the GiGA Drone Racing World Masters 2016) and all-around “Droneholic” Atsushi Yokota (@yokota_a24) is here to tell us more about how to build micro drones. Without further ado, check out his exciting Twitter feed!
◆
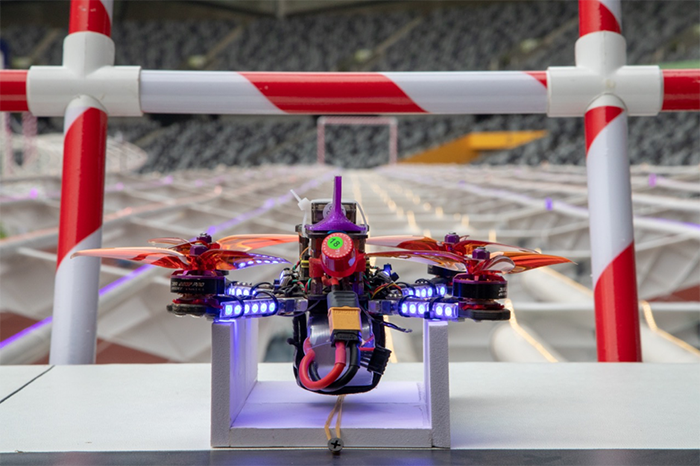
Airframe at the drone race held in Shenzhen, China Photo: Marcus King / FAI
Have you ever heard of the sport called “drone racing?”
At the world championship held in Dubai in 2015, the total prize money reached a staggering $1,000,000. The winner was a 15-year-old boy from the U.K., and the event was covered as major news around the world.
Drone footage is seen almost every day on television and in our daily lives. However, how many people have ever really seen the video from a drone race? This footage is a drone video from my “morning training.”
*Furthermore, I applied to the Ministry of Land, Infrastructure, Transport and Tourism and received permission from the airfield location to fly my drone.
森の中でドローンの時速100キロ出してみた pic.twitter.com/y9dHBn0eCe
— YOKOTA@ドローン中 (@yokota_a24) April 22, 2019
“It looks just like the world of Star Wars”
“Is this what it’s like to use the 3D Maneuver Gear from Attack on Titan?!”
“It’s so fast that it makes me nauseous…!”
This is real footage from a special drone racing airframe flying at a maximum speed of over 150 km/h. The footage from the camera attached to the drone is received in real-time by the goggles, and I watch that while piloting the drone. The feeling of speed and rapid movement is irresistible. Drone racing provides a perspective that you cannot experience with human means of transportation. I also enjoy recording footage with drones, but I really love this unique “FPV flight” style of drone flying that makes me totally addicted to drones.

The author during a race at the world championship held in South Korea in 2016
With a small, palm-sized micro drone, you can fly in locations such as these.
木製ジェットコースターの中でドローン飛ばしてみた pic.twitter.com/SKTdNkPfC3
— YOKOTA@ドローン中 (@yokota_a24) February 3, 2019
By the way, I made all of these drones myself!
I order the parts myself, solder and assemble them, and connect them to a PC to configure them for flight!
They use tools and parts that those of you who have built Arduino and Raspberry Pi electronic kits are probably already familiar with.
That being said, the drone itself just adjusts the rotational speed of the motor attached to the flight controller equipped with various sensors. Therefore, the structure is very simple, and above all there are many parts available, which makes them easy to build. You can equip them with cameras for application to filming or perform real-time image recognition to create automatic avoidance programs.
In this series, we will cover how to gather parts, assemble them, and customize your micro drone, so please take this opportunity to learn more! Try building and flying your very own “micro drone!”

A drone that starts with just a motor and flight controller on the frame
I believe that many readers have used the Raspberry Pi, Arduino, and other micro computers to create their own programs. However, a drone flight controller (“FC”) is almost the same as a micro computer. This is not so much the case these days, but around 2015 many FCs used the Arduino IDE to directly change the settings from the editor. Now, the majority of FCs are operated using a GUI-based app.
The FC itself is low-priced and can be purchased on the Internet for about $10.00. As the sensors reach high levels of performance and quality, they naturally become more expensive. The principles of drone flight are very simple. The FC uses the gyro and acceleration sensors to detect the attitude conditions. Based on that information, it derives the appropriate motor rotational speed, issues rotation instructions, and then basically repeats that cycle! To simplify things, when the drone advances, the FC reduces the rotational speed of the front two motors.
The power supply is the same lithium battery as a smartphone. Propellers made out of plastic are easy to handle. There are various types of motors but using brush motors initially makes it simpler to build. The following lists up the reference prices if you decide to make your own micro drone.
・Flight controller (from $10.00)
・4x motors (from $10.00)
・4x propellers ($10.00)
・Battery (from $3.00)
・Frame (from $5.00)
If you have these parts, then you are ready to build a drone! If you think that you would like to build one, then all you need is $50.00. To add to this discussion, we need to think a little bit about how to control a drone. If you attach a Wi-Fi module and control the drone from a PC, a module that costs just a few hundred yen is enough. However, when operating it from a controller, you will need a receiver for that controller (radio wave transmitter). These come with a wide range of prices and combinations. “Technical standards compliance” is also an issue, so you must be careful.

Racing drone used in the micro drone race held at Chinese Cafe Eight in Roppongi, Tokyo
I explained how the flight controller is similar to a micro computer. However, similar to how you can add LEDs to a Raspberry Pi, install camera sensors, and equip Bluetooth and Wi-Fi features, drone flight controllers can be equipped with many devices.
Drones used for aerial photography, etc. record not only the position information but also use GPS for “stable flight” and may be equipped with atmospheric pressure sensors, compasses, and ultrasonic sensors which you can also choose to attach.
In the world of drone racing, speed sensors are installed to be able to measure the speed in real-time, and you can also measure the time based on drone camera footage and use image recognition technology to recognize objects (in other words, you can lock on to a drone flying at ultra-fast speeds to engage in automatic pursuit).
Similar to how it is currently very common to put Google Analytics measurement tags into a web page, you can also insert a data collection program into the drone and periodically upload it to a server. As we enter a world going forward in which hundreds of millions of drones are flying around, this field will likely become a major industry. It all depends on the idea, but it can expand as much as you like.
So are you starting to become interested in building your own drone?!
In the next section, we will actually gather the drone parts and try building one.
Micro drones are not that expensive, so it is OK to first take on the challenge while investigating on your own. However, there are several hurdles to overcome. I will explain these issues including the legal and qualification problems going forward, so look forward to the next article!
![Tuning a Compact Micro Drone to Create Your Own Original Airframe! [Part one]](https://www.deviceplus.com/wp-content/uploads/2020/07/mcdrone17-150x150.png) Tuning a Compact Micro Drone to Create Your Own Original Airframe! [Part one]
Tuning a Compact Micro Drone to Create Your Own Original Airframe! [Part one]![Tuning a Compact Micro Drone to Create Your Own Original Airframe! [Part two]](https://www.deviceplus.com/wp-content/uploads/2020/07/mcd20-150x150.png) Tuning a Compact Micro Drone to Create Your Own Original Airframe! [Part two]
Tuning a Compact Micro Drone to Create Your Own Original Airframe! [Part two] How to Build Your own IoT Alarm Clock using Blynk
 How to Build a DIY Drone from Scratch Part 1: Building a Cheap DIY Drone
 Reducing the Number of Parts with Digital Transistors: The First Step of a Simple Circuit
 How to Measure Circuit Current with a Shunt Resistor


