![]()
This article was translated to English, and was originally published for deviceplus.jp.
Hello, everyone. My name is Mocchan. Normally, I run a drone shop on the Internet, but I also perform various drone tests and write articles about drones.
In this article, I would like to cover how to tune the various parts of an FPV racing drone which uses a micro drone that has become massively popular recently to create your own original drone.
・About the “TinyWhoop” micro drone
・Battery section: select a more powerful battery while paying attention to the balance between weight and the electrical discharge capacity
・Propeller section: how to select a propeller with changing flight characteristics according to the number of blades
・Motor section: understanding the size and KV value to increase the drone horsepower
・Summary

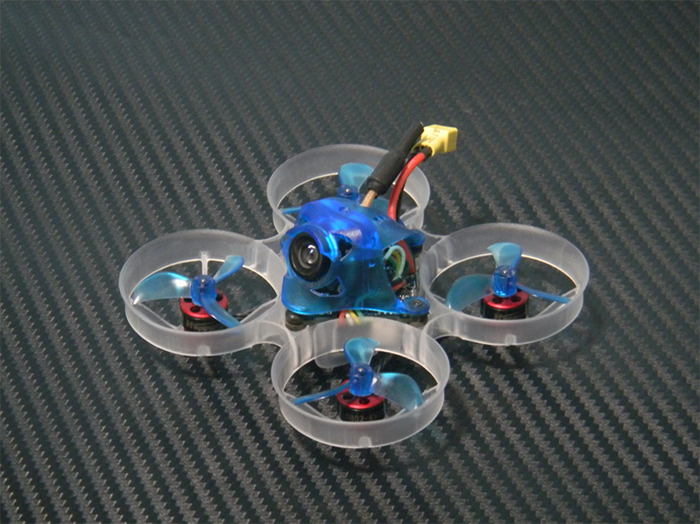
The FPV racing drone called “TinyWhoop” that we will be using today is small and lightweight, which makes it a popular choice for its ability to fly and race even indoors. Another factor in its popularity is that it has a comparatively low threshold, which makes it easy to start for those who are new to FPV racing drones.
Usually, you would choose and fly a commercially-available model. However, it is true that in many cases using the preconfigured airframe configuration and setup provides just the normal specifications. Doing so makes it difficult to understand issues such as what to do in order to get closer to our ideal drone or what changes are produced by changing specific parts. In some cases, choosing the wrong parts may prevent the drone from flying at all or damage the drone by placing too much strain on other parts and specifications.
Using the motor as an example, with large-sized drones you would use a single motor, combine and test it with parts such as propellers and an ESC (Electric Speed Controller, hereinafter “ESC”), measure the thrust and power, tighten up the settings, and then select the parts. However, in the case of a drone with a small motor such as the TinyWhoop, it is currently difficult to perform single item tests to determine the combination of parts.
Of course, it is possible to arrange the conditions to perform a test, but it is not realistic. For this reason, instead of essentially selecting parts based on data, we will first try out the TinyWhoop drone, which is the typical approach. However, the process of avoiding damage to the drone through reckless combinations by knowing how to read and understand the meaning of the specifications and tuning your very own original drone is great fun. In this discussion, I would like to introduce the tuning techniques which are separated in two sections covering both the hardware and software perspectives.

If you wish to fly a micro drone (TinyWhoop) at higher speeds, batteries are comparatively easy to replace and an effective solution. First, let’s check how to read the specifications for such a battery.

The battery used by the TinyWhoop drone is a single-cell lithium-polymer battery (hereinafter, “Li-Po battery”) which says “Li-Po” on it. Recently, the “Li-HV” type of battery with a slightly higher voltage is becoming popular. In this discussion of specifications, we will proceed with the “Li-HV” battery.
First, I will explain the information which is displayed on the battery. The display reads, “1S-250mAh 30/60C HV.” The initial “1S” means that it is a single-cell battery, so it has just one cell. The following “250mAh” is the rated capacity, and it means that the battery can continuously produce a “rated current of 250mA” for one hour.
The “30/60C” in the next part of the specification is the electrical discharge capacity. The “C” displayed here comes from the first letter of “Current” and represents the current. The “30C” in the first half is the continuous electrical discharge capacity and means that the battery can continuously discharge electricity at 30 times the rated current. In the case of our example battery, that would be 30 times the rating. The rated current of 250mA multiplied by 30 gives us 7500mA, so we know that it can continuously discharge 7.5A of electricity. In contrast, the “60C” in the latter half is the maximum instantaneous electrical discharge capacity. In this case, multiplying the rated current of 250mA by 60 gives us 15000mA, which means that it can produce an instantaneous current of 15A.

The final “HV” display means that it is high-voltage. While a normal Li-Po battery has a nominal voltage of 3.7V, an HV battery has a slightly higher nominal voltage of 3.8V. Incidentally, this is the voltage called the nominal voltage, which is not the voltage when the electricity has been completely discharged. The normal full charge voltage of a Li-Po battery is 4.2V, but for an HV-type it is 4.35V. A lithium battery is charged using compensated voltage control (peak voltage system). If a Li-Po battery is charged with a Li-HV charger, it will definitely “overcharge” which may damage the battery cell, so it is dangerous to confuse the two types. Be sure to standardize on either Li-Po batteries or Li-HV batteries.
Our discussion has gotten a little off track, so let’s return to the topic of how to read the battery specifications. Using a battery that can produce a high, stable current to create power is good. However, as we learned in the formula to calculate the extracted current above, in order to do so it is better to switch to a battery with a high rated current or electrical discharge capacity.
What I would like you to pay close attention to here is that these numbers are completely proportional to the weight. This is because the rated current is determined by the volume of polymer electrolytic solution inside the battery, and the electrical discharge capacity is determined by the surface area of the inner electrode which comes into contact with the electrolytic solution. The airframe of the TinyWhoop drone has a flight weight of only around 30g, so the weight restrictions are severe. We should try to make it as lightweight as possible, so we will set the battery specification according to that objective. Normally, we also have to consider the flight time and other issues, so increasing the capacity is beneficial. However, for the reason stated above, the battery capacity is usually kept at around 300mAh. Recently, there are many 300mAh batteries with an electrical discharge capacity of 40/80C available in the market. With these batteries, the rated value is 12A, and the calculation yields a maximum of 24A. Considering that they are about the same size as a AAA battery, that is a surprising level of capacity.

Viewed in this way, they may seem like good batteries. However, in reality they are quite excessive, so if the battery handling is poor, the performance will immediately deteriorate. The deterioration in this case includes symptoms such as the cell expanding inside the battery. Performance and durability are inversely proportional, so immediately stop using a battery if it starts to expand or lose power.
Up to this point, we specifically focused on the peak power and punch power in discussing the Li-Po battery replacement. However, there is also a completely different approach. That approach considers the weight. During normal flight, the consumption current of the TinyWhoop is only between 4 and 5A. At that level, a battery with specifications of about 230mAh 30C can also be said to be sufficient. The battery weight occupies a significant amount of the flight weight as a component part of the TinyWhoop. Reducing this weight can increase the rotationality.

While it depends on the size of the race course, rotationality becomes a significant weapon in a drone race based on speed. Crafting a lightweight machine with the characteristics of a cornering machine is also an interesting approach. However, this is impossible without the right maneuvering technology, so this cannot be said to be suitable to all tastes.

Next, we will touch on the machine specifications to build a high speed machine. This will involve the replacement of parts, so let’s also learn how to disassemble it without damaging the airframe.
First, let’s start with an easy task by replacing the propellers. There are various types of propellers which differ according to the number of blades and the manufacturer-designed shapes. The general trend is that propellers with a lot of blades have good floating and stability characteristics which are often configured with mild settings. However, even propellers with four blades can have different tendencies when comparing wide blades with narrow ones. You cannot just talk about the number of blades, so I think that it is good to try different types.

I will start by introducing the general theory behind propellers. In terms of efficiency, a smaller number of blades tend to have a higher efficiency. An extreme example would be to place a counterweight (a dead weight attached to the blade shaft to maintain the propeller balance) facing a single blade. However, if we exclude such a special type of propeller, fewer blades are naturally lighter and have a smaller surface area. Therefore, the response is good when the pilot steers, but the length of such a propeller is limited and tends to lack thrust. Two-blade propellers provide little thrust, so few people currently use them.

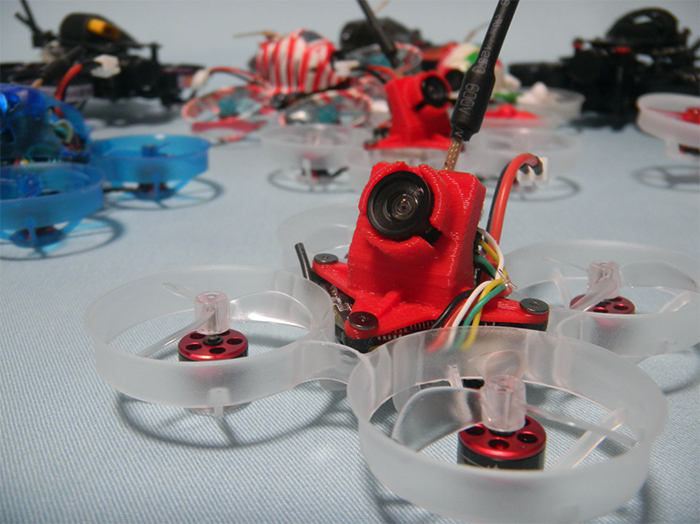
Next are three-blade propellers (left side of the image). Many different types are available on the market, and they provide sufficient thrust. Lightweight and with low resistance, they provide good speed, and there tends to be many products with good steering responsiveness.
Next, we have the four-blade propellers (right side of the image). If the external form is the same size, they provide the best thrust compared to two-blade and three-blade propellers. Therefore, the floating and stability are superior. Among the four-blade propellers, there are those with narrow blades. However, this type is lightweight with low resistance and a good response as well as a strong pull sensation. If you wish to produce more power and speed, changing to four-blade propellers is probably a good idea.
It can be fun to try lots of different propellers according to your own flying style and objectives. It is not common to use different propellers on the left and right sides, but the use of different propellers on the front and back is seen on some drones.

With regard to propellers, when you have a certain degree of skill, you can actually feel how different propellers change the flight. Nonetheless, I think that many beginner pilots will not be able to understand the difference yet. However, there is a difference that you can actually feel. That difference is the flight time. When comparing four-blade and three-blade propellers from the same manufacturer, the three-blade propellers consume less power and tend to have a longer flight time. Since it also depends on the combination with the motor, one cannot make a sweeping generalization. However, changes will appear in characteristics other than flight, so be sure to closely observe how the drone flies.

The motor can significantly change the characteristics of the airframe. The specifications of motors used in drones are divided into the rotational characteristics of “size” and “KV value.” There are no set rules for notating the motor specifications, so there are exceptions. However, most displays use the same notation.

Motor specifications start with a four-digit number that represents the size which is written together in parallel with the KV value. The four digits representing the size are 0603, 0802, etc. However, this represents the size of the stator that the formal wire is wrapped around. The two digits at the beginning indicate the external shape of the stator, and the last two digits are the thickness of the same stator. In the case of an 0603 motor, the external shape of the stator is 6 mm, and the thickness is 3 mm.

Generally speaking, as the external shape of the stator gets larger, the motor torque increases. If the torque increases, it becomes less susceptible to resistance, and the steering response improves. The “torque” in this case is the power which maintains the rotation while the rotating force is called “horsepower.”
The absolute fastest way to increase the horsepower is to increase the rotational speed. This is generally called the “rotational horsepower” and is the simplest method. In the case of brush motors, this specification is expressed by the “KV value.” This KV value represents the motor rotational speed when a voltage of 1V is applied. If “KV16000” is displayed, the theoretical rotational speed when the motor is rotated without a load at a voltage of 1V is 16000.
When this KV value is increased, the horsepower can also be increased. However, when using the same propeller, naturally the current also increases in proportion to the rotational speed. The efficiency will also degrade, so the electric mileage will get worse. In this manner, the sense of power and the electric mileage have an opposing relationship. Finding just the right balance for yourself according to the objective is also an important element in tuning.
That being said, brute force testing requires significant effort with many combinations, so you must select a motor by determining the characteristics to a certain degree. Motors used with the TinyWhoop drone by and large have four types of KV values. The KV values of “16000,” “19000,” “22000,” and “25000” are generally popular, so the motor sizes “0603,” “0703,” and “0802” have been released.

Recently, 0802 motors are often used. The motor which is most frequently used in TinyWhoop drone races is the 0802 size with a KV value of 19000. It has extremely good balance and can be used with three or four-blade propellers. The consumption current is just right, and it can fly for about four minutes under normal flight.
Recently, completed drones which sell well on the Internet, etc. and other airframes that adopt this combination sell many units. This is the most basic style, but even this configuration is sufficient to perform acrobatic techniques such as loops and flips.

However, during freestyle flight, experienced pilots may feel dissatisfied with the climbing power and during tight turns. In this case, increasing the motor’s KV value will generate more horsepower. When advancing from the novice level to true freestyle, be sure to select a motor with a KV value of about 22000.
In addition, when crafting a completely freestyle drone, I think that it is a good idea to increase the KV value to 25000. In this case, choose a propeller with three blades. Four blades will result in an overcurrent and apply a load to the ESC. When using a motor with a KV value of over 20000, the flight time decreases to about two and a half minutes at best. The consumption current also increases to between 9 and 10A when at full power. This also places a significant load on the battery and tends to shorten the lifespan. Therefore, airframe maintenance and part replacement will become important.
In this article, we replaced the battery, propellers, and motor and introduced ways to tune the drone according to your own flight style. In Part two, instead of the hardware aspects of the drone itself, we will change the flight controller settings equipped on the drone to craft an original airframe and tune every aspect of the software. I hope you are looking forward to it!
![Tuning a Compact Micro Drone to Create Your Own Original Airframe! [Part two]](https://www.deviceplus.com/wp-content/uploads/2020/07/mcd20-150x150.png) Tuning a Compact Micro Drone to Create Your Own Original Airframe! [Part two]
Tuning a Compact Micro Drone to Create Your Own Original Airframe! [Part two] Look at How Much Fun Drones Are to Play With! An Introduction to Micro Drones for Maker Fans
 Using a Switching Regulator! Design Your Own DCDC Converter
 How to Measure Circuit Current with a Shunt Resistor
 Linking with Spotify via Pi MusicBox
 Reducing the Number of Parts with Digital Transistors: The First Step of a Simple Circuit


