![]()
In June 2019, the Raspberry Pi 4 Model B (hereinafter, “Raspberry Pi 4”) was announced by the Raspberry Pi Foundation.
In this series of lessons, we will use the latest and hottest Raspberry Pi to explain how to set up the Raspberry Pi from scratch, the necessary components, and how to build electronic kits. So why not take this opportunity to begin a new Raspberry Pi lifestyle?
(Other equipment needed to begin using the Raspberry Pi will be mentioned in the article.)
1. Checking the Raspberry Pi specifications
2. Equipment needed to start using a Raspberry Pi
3. Obtaining the latest OS (Raspbian Buster)!
4. Summary
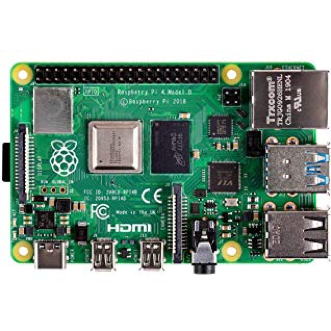
The following is a quick summary of the enhanced specifications of the Raspberry Pi 4 Model B, which was announced in June 2019.

The new Raspberry Pi 4 features a high-speed 1.5 GHz CPU, and in a major change you can now select the memory configuration. As with the previous Raspberry Pi 3, you can select 1 GB, 2 GB, and 4 GB memory configurations. It is thought that these configurations are being made available due to the increasing tendency to use the Raspberry Pi for AI and other edge computing (performing arithmetic processing on the Raspberry Pi itself) applications.
In addition, the Bluetooth feature has been improved, and it includes two USB 3.0 ports. Moreover, there are two micro-HDMI ports which allow two 4K displays to be connected. Finally, the power supply USB connection has changed to Type-C, which enables a closer compatibility with the connectivity environment of recent Macs, etc.
The following table provides a quick comparison with the Raspberry Pi 3B+.
| Board name | Release year | CPU | Memory | Features |
| Raspberry Pi 3 Model B+ | 2018 | 1.4 GHz quad core | 1 GB | Equipped with Wi-Fi and Bluetooth 4.2 Power supplied over Micro USB Full-sized HDMI |
| Raspberry Pi 4 Model B | 2019 | 1.5 GHz quad core | 1 GB 2 GB 4 GB |
(1) Wi-Fi and Bluetooth 5 upgrade (2) Power supplied over USB Type-C (3) 2 x micro-HDMI ports (4) 2 x USB 3.0 ports |

(1) Upgraded to Bluetooth 5.0, and the BLE connectivity is improved
(2) Previous micro-USB (Type-B) was changed to Type-C
(3) HDMI connection changed to micro ports that can be connected to two displays
(4) Two USB 3.0 ports and two USB 2.0 ports as before
The Raspberry Pi 4 features improved performance and a modern interface! So let’s start using it.
Once again, let’s confirm the items needed to setup the Raspberry Pi. There are no significant changes since the Raspberry Pi 3, but the components are described in detail below for the Raspberry Pi 4.
First, the following components are required at a minimum.
| # | Required item | Description |
| 1 | Raspberry Pi 4 unit | Raspberry Pi 4 Model B |
| 2 | Micro SD card | Recommend a card with 16 GB or more |
| 3 | USB (Type-C) power supply cable | The connector on the Raspberry Pi 4 side changed to USB Type-C. |
| 4 | Micro-HDMI cable | Of course, be sure to prepare a display or television that can be connected over HDMI. |
| 5 | Raspberry Pi case | There are various cases available, but you do not need one. |
| 6 | USB keyboard | This will be described in detail later, but you can also setup and operate the Raspberry Pi in headless mode without a display, keyboard, mouse, etc. |
| 7 | USB mouse | When operating in headless mode, you can just connect to it from the PC. |
| 8 | PC or Mac computer | You can remotely connect from a PC to operate the Raspberry Pi. Once you get used to this approach, you will do most of the work from a PC. |
When purchasing a Raspberry Pi starter kit, sometimes there is a software application called “NOOBS” on the SD card for installing the Raspberry Pi OS.

On the Raspberry Pi 4, the third USB power supply has changed to Type-C, and the fourth port is now micro-HDMI, so be careful. In addition to the necessary connectivity equipment, if you have an HDMI display, USB keyboard, and a mouse, then you are ready to start!

Now that you are ready to use the Raspberry Pi 4, we will prepare the OS, etc.
The Raspberry Pi does not come with an OS installed, so it must be separately installed on an SD card to start the Raspberry Pi from there. The Raspberry Pi Foundation provides the Raspbian OS as a dedicated OS for the Raspberry Pi. In conjunction with the release of the Raspberry Pi 4, the Raspbian OS has been updated to Raspbian Buster. (“Buster” is apparently the name of the dog who appears in the “Toy Story” films.) Conversely, the previous versions of Raspbian (Wheezy and Stretch, etc.) will not run on the Raspberry Pi 4. The latest version of Buster was released in September 2019, so we will obtain that version.
To obtain the latest version of Raspbian, go to the official Raspberry Pi download page. There are two options, the “NOOBS” install software and the Raspbian image file. NOOBS enables you to easily setup the OS, so we will use that option.

https://www.raspberrypi.org/downloads/
The SD card we are using has NOOBS pre-installed, so we can start using it just by inserting the card into the Raspberry Pi. If you have such a pre-installed SD card, you can skip this step.
If you do not have a pre-installed SD card, press NOOBS “Download ZIP” on the following screen, download the file to your PC, and extract the archive.

Next, write the extracted NOOBS file to the SD card. Insert the SD card into the Raspberry Pi 4. Connect the Raspberry Pi 4 to a television, etc. with a micro-HDMI cable and turn on the power.

If the following NOOBS screen first appears after performing that step, then you can start setting up the Raspberry Pi.

In this series, we are using starting to use the latest, high-performance Raspberry Pi 4. I would like to take this opportunity to once again summarize the Raspberry Pi features, setup, and steps to start using electronic kits.
Since Raspberry Pi 4 is available all over the world, please make sure you are not violating any regulations that is unique to your country/region.
In this first lesson, we covered the Raspberry Pi 4 features, necessary components, procedure to start using it, and obtained the OS.
In the next lesson, we will start using the Raspbian OS and become accustomed to the Raspberry Pi. I will also introduce connections to devices for constructing electronic kits. Please look forward to it!
 Introduction to Raspberry Pi 4: Tackling the Basic Electronic Kits With the Raspberry Pi 4!
 Introduction to Raspberry Pi 4: Mastering the Use of the Raspberry Pi 4 in Headless Mode!
 Raspberry Pi – Basic Completion
 Sensor Input Experiment Using Raspberry Pi
 The History and Uses of Raspberry Pi!
 Building a Wavetable Synthesizer with a Raspberry Pi and an Arduino Uno