![]()

In our previous articles, DIY Raspberry Pi Drone: Mechanics – Part 1 and DIY Raspberry Pi Drone: Mechanics – Part 1 (Cont.), we went through each hardware component and assembled the quadrocopter. In Part 2, we will go through the software portion of the quadcopter. We will configure transmitter and receiver and connect to NAZA.
This project allows us to turn some readily available components into a quadcopter capable of taking high-quality aerial photos and stabilized HD video. The craft will also include safety features so new pilots can feel confident flying the quadcopter. A live video stream from the quadcopter is delivered to a mobile device from a Raspberry Pi over WiFi. Having a Linux computer aboard the drone also presents you with many opportunities—additional sensors, computer vision, etc.
The quadcopter assembled in Part 1:
When you first power on your transmitter you will be greeted with a menu very similar to the one below. This menu has a few useful indicators: in the top right is the transmitter’s battery voltage, directly below the battery voltage is the quadcopter’s flight mode, to the left of the battery voltage is the signal strength between the transmitter and the receiver, and the T1 and T2 are timers that can be activated by a switch.

Figure 1. Transmitter main screen
To access the configuration menus we need to configure the transmitter, simply press the Mode button. Use the scroll wheel to the right of the screen to select the MODEL TYPE option and then enter the menu by pushing down on the scroll wheel (I will refer to this action as pressing enter from now on).

Figure 2. Model configuration menu
As you will see our transmitter is configured for Helicopters by default. In order for our transmitter to work for quadcopters, we must change the model type to “AIRCRAFT”. To do this select the TYPE, and push down the center button, and then scroll until the type displays “AIRCRAFT”. Press enter to save your selection.

Figure 3. Model configuration menu after adjusting model type
Once the model type is set to AIRCRAFT, you will see the quadcopter icon as shown in Figure 3. Let’s configure endpoints next!

Figure 4. Channel endpoints menu
Enter the END POINT menu. We can leave the first four channels as they are. However, we need to change the endpoints for channel 5 and channel 6. Use the scroll wheel to select the 5th channel then hit enter and adjust the low (L) and high (H) points for the channels so that they match with the picture above.

Figure 5. Channel reverse menu
Out of the box, the transmitter has the elevator and throttle channels reversed. To correct this enter the REVERSE menu and reverse the ELEV and THRO channels. To do this select the channel, press enter, and then use the scroll wheel to change it from NOR to REV.

Figure 6. Auxiliary channel menu
To link three position switches to the flight mode and orientation lock channels enter the AUX-CH menu. All that has to be done on this page is to set the CH6 switch to SwG.

Figure 7. Failsafe configuration menu
We would like our quadcopter to automatically enter failsafe mode when the transmitter loses connection with the receiver. To do this enter the F/S menu, and set the failsafe channel’s values so that they match the picture above. Essentially what we have configured is for the aileron, elevator, and rudder to be at their midpoint, the throttle to be at 50% (hover) and the flight mode switch to enter failsafe mode.
In order to configure the NAZA-M Lite, we need to install the NAZA-M Lite assistant on our Windows computer. You can download the assistant here. Installation should only a matter of following the onscreen directions.

Figure 8. DJI NAZA-M Lite Assistant main page
There are several flight modes. Let’s take a look at 3 control modes.
Control Modes – DJI Wiki
When failsafe is enabled the quadcopter will stop responding to your inputs and will return to its takeoff position. This feature is very useful (especially for new pilots) when you are losing control of the quadcopter, or if your quadcopter is too far away for you to easily take it back home.
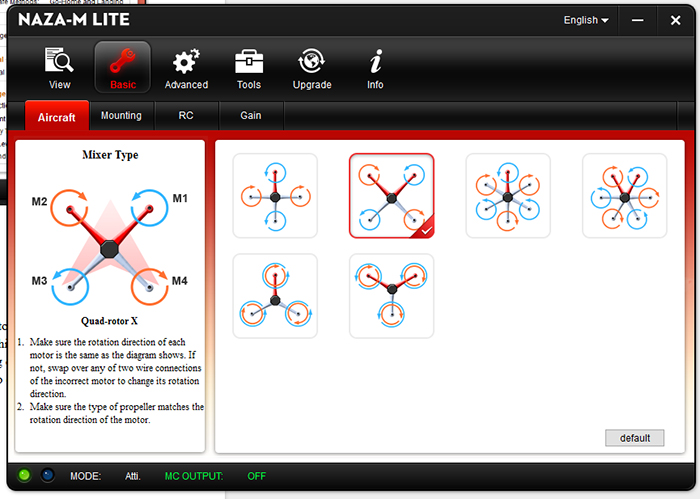
Figure 9. Frame layout selector
Under Aircraft, we can choose the frame layout of the drone. We’ll select “Quad-rotor X”. We’re not selecting the first option which is “Quad-rotor I” because of the orientation. Remember the following diagram?

Figure 10. Numbering of motors assumed by NAZA / Ⓒkenstone6.net
We connected the motors to the flight controller according to the directions of motor rotations shown above. Red arms in Figure 9 or M2 & M1 in Figure 10 indicate the front of the quadcopter.

Figure 11. GPS Mounting settings
Under Mounting, we need to input GPS coordinates. First, you need to balance the quadcopter with the center of gravity directly on the center plate. Then you will fill in the distance between body center of GPS and the center of gravity of the quadcopter in X, Y & Z (Figure 10). The orientation of the MC ESC ports should be pointing to the nose direction.

Figure 12. R/C TX & RX Settings
On this page, you can view the values of each channel and the current flight mode. Make sure that the Receiver Type is selected as Tradition. Everything else can be left alone. Ignore the “Gain” page.

Figure 13. Motor Settings
Set the Motor Idle Speed to RECOMMENDED and the Cut Off Type to Immediately.

Figure 14. Failsafe Settings
This is the page where we select what happens when we enter the failsafe flight mode. I have selected “Go-Home and Landing” over “Landing” because “Landing” will land the drone wherever it is when failsafe is activated. However, the quadcopter may not always be over a safe place to land. Instead the “Go-Home and Landing” option will take the quadcopter up to a height of 20m (will retain its altitude if higher than 20m), fly itself to a point above the spot it took off, then slowly land itself.

Figure 15.Intelligent Orientation Control (IOC) Settings
IOC is basically a headless mode that comes in useful when you try to orient the camera at a specific angle. There are 2 Locks: Home Lock (forward direction = recorded nose direction) and Course Lock (forward direction = home point to quadcopter direction). We won’t be using any of these locks. We’ll set X2 channel “OFF”.
Ignore the “Gimbal” configuration page.

Figure 16. Battery failsafe page
As mentioned in Part 1 of this series, great care must be taken with LiPo batteries in order for them to be safe. The most relevant thing to take care of during flight is the battery’s voltage. To protect against over discharging the battery, enable low-voltage alerts by selecting “On” under Protection Switch, and changing the Battery Type to 3S LiPo. I recommend setting the “First Level Protection” no load voltage at 10.50V, and the “Second Level Protection” no load voltage at 10.00V.
The “First Level Protection” will simply cause the NAZA LED indicator to rapidly flash red. If you see this during flight, you should safely land the drone. If you wait for “Second Level Protection” to come into effect, the quadcopter will automatically land itself to prevent damage to the battery.

Figure 17. IMU calibration page
Before your first time flying your quadcopter, it is important that you calibrate your gyroscope and accelerometer. To do this, simply place your quadcopter on a level surface and click the “Basic Cali” button near the bottom of the page.
We’ll stop here for now! In the next article, we’ll cover how to setup FPV. This part is very important because it allows a live video stream from the quadcopter to be delivered to a mobile device from Raspberry Pi over WiFi. We’ll be using an Android phone. We’ll also create a pre-flight checklist before we fly our quadcopter.
 DIY Raspberry Pi Drone: Mechanics – Part 1DIY Raspberry Pi Drone: Mechanics – Part 1 (Cont.)
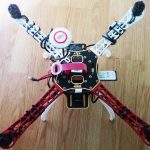 DIY Raspberry Pi Drone Part 3 – FPV Setup Guide
 The Sense HAT Add-On Board For Raspberry Pi – Sense HAT Emulator
 Raspberry Pi WebIOPi IOT Part 2 – Making a flashing LED button
 Guide to Connecting Arduino & Raspberry Pi + DIY Arduino and Raspberry Pi Camera Robot!


