![]()
Table of contents
1 Introduction
1.1 Practical network-attached storage
1.2 Getting your own NAS up and running
1.2.1 Disk setup
1.2.2 Services for NAS
1.2.3 Disk & network performance
2 Bonus circuit: Raspberry Pi ‘HURRiCANE!’ cooling system
2.1 BOM
2.2 MAKE it!
For years, many a geek has wept and cried “USB3? USB3, oh please!” to the hard-working engineers that design Pi’s for consumption by the masses. The Raspberry Pi 3 B+ was a nearly perfect microcomputer, but still wasn’t suitable for network-attached storage (NAS), or just fast USB, or even USB. Having your keyboard lag on input because the Ethernet link is saturated is a special experience.
What’s your grandma to do when she calls you up and asks you about “fancy modern ways” to digitize all her old photo albums? She just wants to browse them (without lag) on her new-fangled iPad, and her fingers are too brittle to turn the heavy pages of the tomes containing precious KODAK moments. Now, grandma needs no longer live without the joys of tech.
However, this article isn’t specifically about digitizing photos. It’s all about storage: simple, FAST network storage.
Firstly, anything with the capability to store data and serve users on a network can be called network-attached storage (NAS). However, the task is doing so in a way that’s user-friendly, smooth, and doesn’t agitate the users.
For example, I have KODI on an Android box. It’s not too fast, and the microSD is filled with old data. However, it works extremely well for watching movies and playing music, after I installed a KODI plugin to connect to my Samba server on the local network. Gigabits of entertainment are pouring into it, and it took only a few minutes to set up my old router (with its obscure firmware) to serve data from the USB2 hard disk it has plugged in. That’s NAS, but it’s bad NAS. We can do better.
A good NAS is stable, delivers data quickly and with low latency, has redundancy (such as RAID1), supports hot-swapping of disks when the system is running, and offers a smattering of protocols for accessing the data stored on it. Protocols such as FTP, SMB/CIFS, NFS, and AFP are still common. For years, I’ve looked for a low-energy system that could do better than USB2 and 100Mbit/s, and have enough CPU power and RAM to host all kinds of services. I looked curiously at a Cubieboard 2 with its excellent SATA port, but Armbian is just too alien.
When all hope had died, the Raspberry Pi 4 was released, with quad-core 1.5GHz CPU, 1/2/4GB DDR4 RAM, really-gigabit Ethernet, and USB 3.0. The Ethernet port is no longer bogged down by the USB2 bus, forcing you to use only Wi-Fi. That it has dual microHDMI ports doesn’t hurt, but it also doesn’t help.
I just need a small desktop microcomputer that can still run reliably, even if it’s handling some large network transfer loads.
I tested the Raspberry Pi 4 in just this way, and it measures up. Of course, there’s the heat problem. Unloaded, this microcomputer will heat itself up just for kicks. Loaded, it’ll quickly hit a system temperature of 176 degrees F, and instead of kicking the bucket and crashing, or spectacularly releasing the magic smoke, it merely becomes an unusable paperweight — running at 600MHz. However, there’s a fix for that, as you’ll see in section 2, with the unveiling of a truly hackable GPIO-controlled less-than-or-equal-to 45-watts fan.
Regardless of the problem with overheating, this Pi is perfect for a home/workgroup NAS, and a 2.5″ USB3 hard drive is adequate. I’d recommend getting a 12V 3.5″ drive in a disk bay, instead of a single cable 2.5″ drive if you want the best performance. My 2.5″ USB drive uses a cable, and pulls a maximum of 4.48W, so you’ll definitely need a 15W power supply for your Pi should you choose a 2.5″ drive without external power.
Let’s build a Raspberry Pi 4 NAS!
Note that you can still follow these instructions if you have an earlier Pi model, though a Pi 2 would be a sane minimum requirement. On the Pi 3, you should serve files via the Wi-Fi interface, as it’ll be much faster!
The first order of business is setting up the Pi itself. Follow these instructions, and you’ll be up and running in no time. We’ll happily assume you also have your external hard drive ready. It needs a bit of attention. If this were Slashdot, instantly a discussion would spawn about the merits of “btrfs,” or “Btrfs” as some purists insist. I’ve used it, and I’ve also used ZFS. Neither btrfs nor ZFS is relevant unless you want snapshots, and certainly not for a home/workgroup NAS. This is a single disk setup, and you should definitely use ext4. It’s cool.
Get your system up to date. Copy and paste these commands into your Pi’s terminal:
|
1 2 3 4 5 6 7 8 9 10 |
DEBIAN_FRONTEND="noninteractive" DEBIAN_PRIORITY="critical" DEBCONF_NOWARNINGS="yes" export DEBIAN_FRONTEND DEBIAN_PRIORITY DEBCONF_NOWARNINGS apt update || echo "[!] Failed to update index lists!" dpkg --configure -a || echo "[!] Failed to fix interrupted upgrades!" apt --fix-broken --fix-missing install || echo "[!] Failed to fix conflicts!" apt -y --allow-downgrades --fix-broken --fix-missing dist-upgrade |
Then, reboot, and run the command below. This will install ProFTPd, Samba, a password generator, a client for SMB/CIFS, and WiringPi for simple GPIO control.
|
1 2 3 |
sudo apt-get -y install proftpd samba pwgen smbclient wiringpi |
If you’re not a minimalist, you’re probably using a graphical user interface on your Pi. If so, follow these instructions to set up your disk. Careful: Remember to set up the disk, not a connected microSD card or a disk you didn’t intend to modify!
If you opted to only install Raspbian Lite (no GUI), you can set up your disk with “cfdisk.” Make sure no other USB drives are connected to your Pi, and then we can be sure it’s called “sda.” Plug in the USB drive to your Pi, open a terminal, and issue the command: “sudo cfdisk /dev/sda”

Choose “dos”.

If there’s already a partition, choose “Delete.” Then, choose “New.” Else, just choose “New.” It’ll be of the type “Linux,” as shown below. Use all available space on your drive.

Use the arrow keys to move the highlighted field to “Write,” and enter “yes” when prompted. Then, move the highlighted field to “Quit” and hit ENTER.
Back at the prompt, let’s have a tiny break and think for a moment. Do we want to have 5%, or even 10% of our disk’s space reserved for the “root” user, on a filesystem that won’t host any system files? This isn’t “/var” or “/,” after all.
We don’t. We want all available space for grandma’s photo digitization effort, and media/workgroup data. The “-m” flag to mkfs.ext4 determines how much space is reserved for the “root” user. The”‘-L” flag sets the name of the disk, and you can set that to whatever you like. When in doubt, use “FOO.” Now, issue the command:
|
1 2 3 |
sudo mkfs.ext4 -L FOO -m 0 /dev/sda1 |
Moments later, your journaled filesystem is ready on “/dev/sda1.”

You can mount it anywhere you like, but let’s create a user for our NAS. Let’s call him “nas.” Let’s make his home directory world-writable and sticky. Sticky like “/tmp.” Copy and paste these commands into your terminal:
|
1 2 3 4 5 6 7 8 |
sudo useradd -b /home -m -p $( pwgen --secure 32 1 ) \ -c "NAS account" nas sudo chmod 1777 /home/nas sudo mount -o rw,noatime,nodev,nosuid,noexec \ /dev/sda1 /home/nas sudo chown nas:nas /home/nas sudo chmod 1777 /home/nas |
To make sure we’ll be mounting this exact disk at “/home/nas” every time, let’s use the disk identifier. The “/dev/sda1” device is subject to change. “sda” could be a USB thumb drive on next boot. The disk identifier isn’t changing, however. Let’s get it!
|
1 2 3 |
sudo fdisk -l /dev/sda |
The output will be something along the lines of
|
1 2 3 4 5 6 7 8 9 10 11 12 |
Disk /dev/sda: 223.6 GiB, 240057409536 bytes, 468862128 sectors Disk model: Crucial_CT240M50 Units: sectors of 1 * 512 = 512 bytes Sector size (logical/physical): 512 bytes / 4096 bytes I/O size (minimum/optimal): 4096 bytes / 4096 bytes Disklabel type: dos Disk identifier: 0x0acb1143 Device Boot Start End Sectors Size Id Type /dev/sda1 2048 468862127 468860080 223.6G 83 Linux |
We want the line starting with “Disk identifier” for this. Strip the leading “0x” from “0x0acb1143,” and append a “-01,” and you’ve got something that means the same as “/dev/sda1,” but uniquely so. The string “0acb1143-01” is exactly what we want, so let’s add it to fstab:
|
1 2 3 |
PARTUUID=0acb1143-01 /home/nas ext4 defaults,noatime,nodev,nosuid,noexec,noauto 0 0 |
The last mount flag, “noauto,” tells your Pi to not automatically mount that partition at that mount point when booting up. Pretty good idea if you’ve forgotten to plug in the disk. You can omit “noauto” when you’re ready to deploy your NAS. The only downside to “noauto” is that you have to log in as “pi” and run the command:
|
1 2 3 |
sudo mount /home/nas |
… after every reboot.
Now mount the disk with:
|
1 2 3 |
sudo mount /home/nas |
You’re good to go. Well, not quite.
You’ll need to enable a few services. Fortunately, we installed ProFTPd, Samba, and already had OpenSSH installed on our very first boot.
First, unzip this file in your “pi” home directory. You’ll be doing a lot of file transfers, so you may as well install FileZilla now. Copy rpi4_nas+hurricane.zip to “/home/pi” on your Pi, and then copy and paste the following into your Pi’s terminal:
|
1 2 3 4 5 6 7 8 9 10 11 12 13 14 15 16 17 18 19 20 21 22 23 24 25 |
unzip rpi4_nas+hurricane.zip sudo cp -vp /etc/proftpd/proftpd.conf /etc/proftpd/proftpd.conf.bak sudo cp -v proftpd.conf /etc/proftpd sudo chown root:root /etc/proftpd/proftpd.conf sudo chmod 0644 /etc/proftpd/proftpd.conf sudo cp -vp /etc/samba/smb.conf /etc/samba/smb.conf.bak sudo cp -v smb.conf /etc/samba/smb.conf sudo chown root:root /etc/samba/smb.conf sudo chmod 0644 /etc/samba/smb.conf sudo service proftpd restart sudo systemctl enable proftpd echo "ProFTPd (FTP) has been started and enabled on boot!" sudo service smbd restart sudo systemctl enable smbd echo "Samba (SMB/CIFS) has been started and enabled on boot!" sudo service ssh start sudo systemctl enable ssh echo "Secure Shell (SSH) has been started and enabled on boot!" echo "Enter SMB/CIFS password to be used for user 'nas'" sudo smbpasswd nas echo "Enter SMB/CIFS password to be used for user 'pi'" echo "(This does not need to match your 'pi' login password!)" sudo smbpasswd pi |
When your Pi is done digesting your commands (and you’ve entered a few passwords), you have FTP, SMB/CIFS, and SSH access to your NAS. Both FTP and SSH let you log in to your NAS using your “nas” user’s password. Change it with “sudo passwd nas” as needed. “smbclient” is installed, so let’s look at what your system offers to the network:
|
1 2 3 |
smbclient -N -L //localhost |
Which outputs
|
1 2 3 4 5 6 7 8 9 10 11 12 13 14 15 16 17 |
Anonymous login successful Sharename Type Comment --------- ---- ------- homes Disk User Home Directories IPC$ IPC Service (Samba 4.9.5-Debian) Reconnecting with SMB1 for workgroup listing. Anonymous login successful Server Comment --------- ------- Workgroup Master --------- ------- WORKGROUP |
Logging in as my “nas” user (password “foo bar baz”), with the disk mounted in “/home/nas”
|
1 2 3 4 5 6 7 8 9 10 11 12 13 14 |
pi@uNAS 0 ~ $ smbclient --encrypt //localhost/homes --user=nas%'foo bar baz' Try "help" to get a list of possible commands. smb: \> ls . D 0 Wed Jul 31 10:54:46 2019 .. D 0 Wed Jul 31 08:15:21 2019 nas D 0 Tue Jul 30 20:48:48 2019 lost+found D 0 Sun Oct 7 15:10:07 2018 disk_speed_test.log N 215 Wed Jul 31 09:16:49 2019 disk_speed_test.sh N 795 Wed Jul 31 07:10:49 2019 479639216 blocks of size 1024. 455131416 blocks available smb: \> exit |
The “smbclient” program is perhaps not so intuitive, but just consider these two commands. They’re identical, except in that the first is explanatory, and the second will connect to the “nas” user home folder:
|
1 2 3 4 |
smbclient --encrypt //IP_ADDRESS/SERVICE --user=USERNAME%PASSWORD smbclient --encrypt //127.0.0.1/homes --user=nas%'foo bar baz' |
USB3.0 supports a maximum of 5Gbit/s (625MByte/s), but no spinning (i.e. magnetic) drive is likely to exceed 800Mbit/s (100MByte/s). What can you get?
In this case, using a 2.5″ drive, using less than 5W of power, it’s not bad actually. My tests nearly all yielded ~640Mbit/s, both across the network and locally on the Pi. You can try the included “disk_speed_test.sh” script yourself, or not. I’ll save you the trouble:
|
1 2 3 4 5 6 7 8 9 10 11 12 13 14 15 16 17 18 19 20 21 22 23 24 25 26 27 28 29 |
sudo ./disk_speed_test.sh [!] Unmounting /dev/sda1 (if mounted) ... vm.drop_caches = 0 [!] Testing write speed (cached) ... 1024+0 records in 1024+0 records out 1073741824 bytes (1.1 GB, 1.0 GiB) copied, 12.1259 s, 88.5 MB/s vm.drop_caches = 3 [!] Testing write speed (uncached) ... 1024+0 records in 1024+0 records out 1073741824 bytes (1.1 GB, 1.0 GiB) copied, 12.6074 s, 85.2 MB/s removed '/mnt/nulls.dd' vm.drop_caches = 0 [!] Testing cached/buffered read speeds (three times) ... /dev/sda: Timing cached reads: 1648 MB in 2.00 seconds = 824.24 MB/sec Timing buffered disk reads: 244 MB in 3.02 seconds = 80.78 MB/sec /dev/sda: Timing cached reads: 1658 MB in 2.00 seconds = 829.26 MB/sec Timing buffered disk reads: 242 MB in 3.01 seconds = 80.46 MB/sec /dev/sda: Timing cached reads: 1656 MB in 2.00 seconds = 827.66 MB/sec Timing buffered disk reads: 242 MB in 3.00 seconds = 80.65 MB/sec |
USB2 could at most yield 480Mbit/s (~60Mbyte/s), but really never did, so this is a substantial improvement. At this data rate, you can transfer ~5.1GB in a minute, and over 300GB in an hour. If you get poor performance, try the command “sudo hdparm -B 255 /dev/sda,” and test again. If this fails, use “lsusb” to discover if your USB3 device is really a USB3 device. Look for bcdUSB. My disk reports “bcdUSB 3.0.” What about yours?
|
1 2 3 4 5 6 7 8 9 10 11 12 13 |
pi@uNAS 0 ~ $ lsusb # ... Bus 002 Device 003: ID 1058:0748 Western Digital Technologies, Inc. My Passport (WDBKXH, WDBY8L) # ... # Only look at specific device, use USB VID:PID pi@uNAS 0 ~ $ lsusb -d 1058:0748 Bus 002 Device 003: ID 1058:0748 Western Digital Technologies, Inc. My Passport (WDBKXH, WDBY8L) # More verbose, please pi@uNAS 0 ~ $ lsusb -d 1058:0748 -v | egrep 'bcdUSB|MaxPower' bcdUSB 3.00 MaxPower 896mA |
Informative, and my drive is indeed USB3. And, it promises to use a maximum of 4.48W. Great!
As far as the network is concerned, use CAT6 cables and, if a switch is between your router and your Pi, make sure it’s a gigabit switch. I had to poke around a bit to find the best settings for lots of TCP packets, and it turns out Raspbian is already good at it. However, if you find you’re having problems, try this in your Pi’s terminal:
|
1 2 3 4 5 6 7 |
sudo sysctl -w net.ipv4.tcp_window_scaling=1 sudo sysctl -w net.core.rmem_max=16777216 sudo sysctl -w net.core.wmem_max=16777216 sudo sysctl -w net.ipv4.tcp_rmem='4096 87380 16777216' sudo sysctl -w net.ipv4.tcp_wmem='4096 16384 16777216' |
If it helps, make your changes persist across reboots, like so
|
1 2 3 4 5 6 7 8 9 |
sudo cat>>/etc/sysctl.conf<<-"EOF" net.ipv4.tcp_window_scaling = 1 net.core.rmem_max = 16777216 net.ipv4.tcp_rmem = 4096 87380 16777216 net.ipv4.tcp_wmem = 4096 16384 16777216 EOF sysctl -p |
With great power comes much heat. The Raspberry Pi 4 can’t avoid hitting the 176-degree mark, and then it drops its CPU frequency to 600MHz. You’re pretty much back to having four Raspberry Pi 1’s clustered on your desk. Without cooling, you can enjoy text-based WWW browsing, and reading e-books with vi.
There are two ways to handle this. Either get something such as the active ICE Tower CPU cooler, which cools only the CPU; or, attach small, high-profile heatsinks to every chip that gets hot under load, and then pushing an adequate airflow into and across these. With just a 3W fan, I dropped my system temperature to ~104 degrees. CPU fans really should run at 12 volts. Let’s go with that!
First, copy the script below to your Pi home folder. Copy it, and in your Pi’s terminal enter “cat >>hurricane.sh<<-“EOF.” Then, paste it, hit enter, type EOF, and hit enter again.
[begin hurricane.sh]
|
1 2 3 4 5 6 7 8 9 10 11 12 13 14 15 16 17 18 19 20 21 22 23 24 25 26 27 28 29 30 31 32 33 34 35 36 37 38 39 40 41 42 43 44 45 46 47 48 49 50 51 52 53 54 55 56 57 58 59 60 61 62 63 64 |
#! /usr/bin/env bash # Depends on the 'wiringpi' package. set -u -o pipefail trap 'printf "\n[!] Cleaning up pin modes and bailing out!\n" ; \ /usr/bin/gpio export 18 low ; \ /usr/bin/gpio export 23 low ; exit ' INT TERM _fan_pin=18 # BCM18, BOARD12 _led_pin=23 # BCM23, BOARD16 # Don't let it run for too long _temp_upper=55 # Start at _temp_lower=45 # Stop at _is_cooling_active=0 _interval=5 _gpio=$( which gpio || NO ) if [ $_gpio = NO ] ; then echo "ERROR: Is wiringpi installed? Do 'sudo apt-get -y install wiringpi'." exit 1 fi function printBanner { cat < ${_temp_f}F" return $_temp_f } # Fahrenheit to celsius: C = ( F - 32 ) * 5/9 function fahrenheit2celsius { local _temp_c=$( echo $1 | awk \ '{ printf( "%.1d\n", ( $1 - 32 ) * 5/9 ) }' ) #echo "${1}F => ${_temp_c}C" return "$_temp_c" } function hurricane { if [ $# -eq 0 ] ; then echo no args? ; return 1 ; fi if [ $1 -eq 1 ] ; then echo "HURRiCANE cooling system: ACTIVE" $_gpio export $_fan_pin high $_gpio export $_led_pin high _is_cooling_active=1 elif [ $1 -eq 0 ] ; then echo "HURRiCANE cooling system: INACTIVE" $_gpio export $_fan_pin low $_gpio export $_led_pin low _is_cooling_active=0 fi } printBanner while true ; do _temp=$( vcgencmd measure_temp | awk -F= '{print $2} ' | awk -F. \ '{print $1}' ) _temp_f=$( celsius2fahrenheit $_temp ) if [[ $_temp -ge $_temp_upper && _is_cooling_active -eq 0 ]] then hurricane 1 elif [[ $_temp -le $_temp_lower && _is_cooling_active -eq 1 ]] then hurricane 0 fi celsius2fahrenheit $_temp printf "System temperature: ${_temp}C / %iF\n" $? sleep $_interval done |
[end hurricane.sh]
What’s worth noting is the short interval between the variables “_temp_upper” and “_temp_lower.” The first marks the temperature at which you’d want the cooling system to kick in, and the second marks the lower temperature threshold at which you want your fan to turn off. This serves both to reduce noise considerably and increase the lifespan of your fan.
All that remains is to make the board. Let’s not worry about it being too complex; it’s very simple.
Behold, a Fritzing pictorial diagram of the greatest ventilation system ever applied to a microcomputer outside of NASA’s deep space labs! Get it? Ventilation? Because deep space is so cold that cooling is never more than an airlock away, and thorough ventilation is a no-no on space stations.
Anyway, have a look-see at two different cooling options:

Promises much, but is at 55C/131F when idle.
Thermal stress is the thing that kills electronics, at least electronics without moving parts. The stress comes from expansion and reduction in size, though it’s not visible to the human eye. It’s easier to replace a fan after a few years than a Pi lost in space. The Robinsons can’t afford to lose their robot friend.
Fortunately, the “HURRiCANE!” solves all problems. What we want is a few nice, high-profile heatsinks on the CPU and Wi-Fi/Bluetooth chip, in the upper-left side of the board, and the chip to the left of the CPU. Copper conducts heat better, but aluminum releases it more readily into the airflow of the “HURRiCANE!.”
A higher profile gives the heat a greater surface area from which to radiate into the airflow, which means we can avoid the Raspberry Pi 4 ever clocking down again.
The heatsinks in the component list above all have thermally conductive adhesive tape. The reason we want three is that the three big chips in the upper left part of the Raspberry Pi have uneven height profiles.
There are RF shields on the CPU and Wi-Fi/Bluetooth chip, and well, that makes placing a BIG heatsink on them very difficult. Before attaching the three heatsinks, be sure to wipe them over first with cotton swabs soaked in isopropyl alcohol.
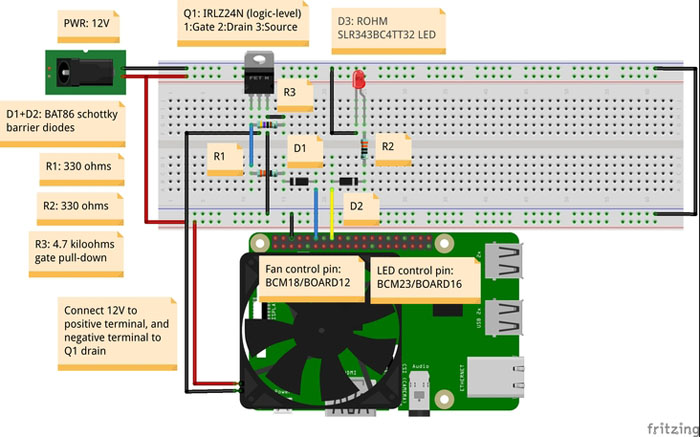
I bought one of those promising little “active cooling systems” for my Raspberry Pi 4. Rather than cool well, it sucked hard. The IRLZ24N MOSFET removes all unreasonable power concerns, turns on well at 2V (so 3.1V must be better), and in case the MOSFET fails, we use BAT86 schottky barrier diodes to protect our output pins, BCM18/BOARD12, and BCM23/BOARD16. Note that the BCM18/BOARD12 pin is a PWM pin, and you can swing the voltage down from 3.1V if you wish.
By connecting 12V to the fan’s positive terminal, and fan’s negative terminal to the drain of the MOSFET, we place the load where it belongs. Then, we wire the MOSFET’s source to ground, and BCM18/BOARD12 in series with a BAT86 diode in forward bias to the gate, then a 330 ohms resistor to limit the maximum current to 10mA.
Note there’s a 4K7 pull-down from the gate to GND; without this, the gate would be floating stupidly when not fed 3.1V, and it wouldn’t be possible to turn off the MOSFET reliably (or quickly). Never forget a pull-down.
Then, build the little board.

Using three 2P 2.54mm screw terminals makes connecting the signal lines from your Raspberry Pi much easier, and you should label them with a permanent marker. I marked mine “Fan S+,” ‘”12V,” “GND” and “LED S+,” and for the fan itself, I simply marked with “+” and “-.”
The two diodes protecting your Pi output pins are important. If you get the bias wrong on these, you’ll have to desolder them and flip them. You want the anodes facing your Pi pins, and the cathodes facing the MOSFET and LED anode. The cathodes are marked with small black rings in the picture above. The schottky diodes only drop ~0.2V, so we can confidently use these with a Pi, and still pop the MOSFET at a reasonable “ON” resistance. At a load of 3W, our IRLZ24N won’t even raise its temperature above ambient. If you use a powerful CPU fan, say 10-12W, you may need to attach a small 1W heatsink, but nothing too big.
Once you’ve assembled and soldered your board, and connected it to your Raspberry Pi 4, you’re guaranteed a cool-running system for years and years. WiringPi makes it much simpler than it seems in the script above; we’re literally just flipping pins between 3.3V and 0V. Bear in mind that a 12-volt fan is only used because they’re so powerful and abundant. You can use a 5-volt fan if you want.
Enjoy!


