![]()

For this tutorial, we’ll be using Watchdog board for Raspberry Pi Model B+. That’s right, it’s a watchdog board that can be mounted onto a Raspberry Pi!
A watchdog is a device used to protect a system from specific software or hardware failures that may cause the system to stop responding. The application is first registered with the watchdog device. Once the watchdog is running on your system, the application must periodically send information to the watchdog device. If the device doesn’t receive this signal within the set period of time it would execute the proper keystrokes to reboot the machine or restart the application.
Watchdog is a function that monitors whether the system is running normally or not.
The watchdog board for Raspberry Pi Model B + we’ll be using this time has a built-in program to monitor the GPIO in advance, so it can be installed very easily.

Figure 1
Watchdog timer board for Raspberry Pi Model B+
The IC with the built-in countdown timer monitors GPIO of Raspberry Pi, and the software on Raspberry Pi sends pulse signals to GPIO at a fixed interval to reset the timer in the IC.
The countdown timer on the watchdog does not reset when no pulse signals are sent due to an error on the Raspberry Pi. The IC on the board will then stop providing the power to Raspberry Pi and restart providing the power to restart the Raspberry Pi.
We’ll be using this watchdog board. There is “Raspberry Pi Model B +”, but it also works for Raspberry Pi Model A +, as well as Raspberry Pi 2 Model B. In this tutorial, we’re using Raspberry Pi 2 Model B.
How to use the watchdog timer for Raspberry (in Japanese) provides details on the watchdog board we’ll be using today. We’ll refer to this page as we proceed further.

Figure 2
As with Sense HAT, you can just plug the watchdog into the GPIO pin of Raspberry Pi to connect it. If you want to fasten the boards so they are securely connected, please feel free to use Raspberry Pi screws and spacers.

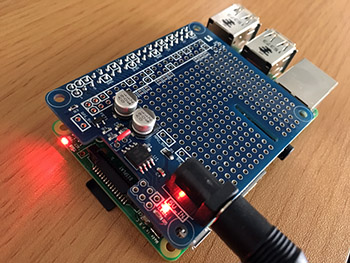
Figure 3
As shown in Figure 3, connect the power using the DC jack to the watchdog board. The DC connector will supply power to both the watchdog and the Raspberry Pi body.
The following two points can be confusing so let’s clarify…
1. Supply 5V power from the DC jack on the watchdog board.
As written on How to use the watchdog timer for Raspberry, the power should be supplied from the DC jack on the watchdog board. It’s different from powering Sense HAT using GPIO pins.
2. Do not use the power supply of the Raspberry Pi body
Since the power is taken from the DC jack of the watchdog, the power (microUSB) of the Raspberry Pi main unit is not used. If another power supply is passing, it will not initiate a restart of the Raspberry Pi, even if the watchdog operates fine.
I learned this the hard way and had to juggle around with power supplies so many times to figure this out!
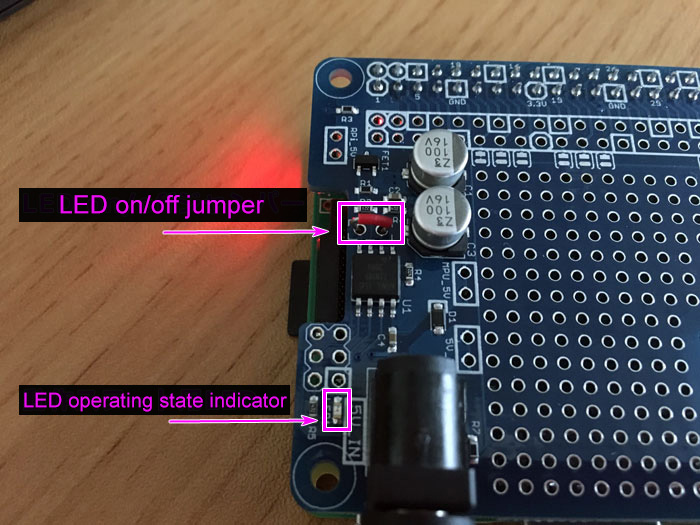
Figure 4
When checking the operation, LED state indicator should be lit up. It is off by default for power saving, but it will be turned on when shorting the LED on/off jumper. I used a jumper pin to short circuit, but in the picture, it’s replaced with a jumper wire.
Lighting up the LED follows the following three states. It’s hard to imagine using the numerical values (seconds), but you’ll notice obvious differences when the LED flashes.
How to light the LED at each state:
For this tutorial, we’ll be using Raspberry Pi 2 Model B and Raspbian Jessie with PIXEL released in 2016-11-25.
sudo apt-get update
sudo apt-get upgrade
After writing Raspbian to the SD card, run the above commands as usual.

Figure 5. Watchdog Program State Transition/©SwitchScience
The watchdog operates as shown in Figure 5. Simply turning on the power does not start up the watchdog. The default state of “State LED blinks once every about 2.56 seconds” continues. For details on how to activate the watchdog, please refer to How to use the watchdog timer for Raspberry (Japanese). They are listed at the bottom of the page.
To prepare Raspberry Pi, run a program that automatically generates a pulse signal to the monitoring port (GPIO 17 by default) once it is ready to boot up.
This is quite important. A source program that performs this processing is also listed:
Raspberry Pi sample program (Python) – Japanese
The operation of the program is “to output a pulse to the GPIO 17 once a second”.
In order to link with the watchdog board, it is necessary to automatically start a program that pulses this GPIO. By doing this, you can reuse the watchdog function automatically even if Raspberry Pi reboots.
Let’s start up the watchdog using this program!
sudo nano blink17.py
|
1 2 3 4 5 6 7 8 9 10 11 12 13 14 15 16 17 |
#!/usr/bin/env python import RPi.GPIO as GPIO import time LEDPIN = 17 GPIO.setwarnings(False) GPIO.setmode(GPIO.BCM) GPIO.setup(LEDPIN, GPIO.OUT) while True: LEDon = GPIO.output(LEDPIN, 0) time.sleep(0.5) LEDoff = GPIO.output(LEDPIN, 1) time.sleep(0.5) |
First, save the program in a folder and execute it with the following command.
python blink17.py
Since the watchdog starts up when it detects five pulses, in this program the state LED will blink once in about 0.32 seconds after 5 seconds of the execution. After that, if there is no pulse for more than 5 seconds, the status LED changes to flashing LED once every 0.08 seconds and the reboot is performed automatically. (In the video, it is forcibly terminated with [Ctrl] + [C]).
It’s convenient to set the program for the watchdog to run at startup so that the program runs even after automatic reboot!
Let’s test by using a program adjusted so as to process only for 30 seconds (Since it’s difficult to release cron if it’s too short, at least 30 is recommended).
|
1 2 3 4 5 6 7 8 9 10 11 12 13 14 15 16 17 18 19 20 21 22 23 |
sudo nano blink17_30sec.py #!/usr/bin/env python import RPi.GPIO as GPIO import time LEDPIN = 17 SEC = 0 GPIO.setwarnings(False) GPIO.setmode(GPIO.BCM) GPIO.setup(LEDPIN, GPIO.OUT) while SEC < 30: LEDon = GPIO.output(LEDPIN, 0) time.sleep(0.5) LEDoff = GPIO.output(LEDPIN, 1) time.sleep(0.5) SEC = SEC + 1 print SEC |
Next, register it with cron after granting execution privilege.
sudo chmod 755 blink17_30sec.py
crontab -e
Since we want to execute it at “startup,” let’s specify “@ reboot”. I added the following to the last line.
|
1 |
@reboot python /home/pi/blink17_30sec.py |
Reload cron and restart Raspberry Pi.
sudo /etc/init.d/cron restart
sudo reboot
The state is easy to understand when you look at the blinking LED.
When you are done checking the operation, let’s undo the cron setting. When introducing, it’s OK to change the program to be called with cron to continue sending a pulse without restriction (blink 17.py in this case).
A watchdog comes in very handy for remote access and control. For whatever reason your Raspberry Pi freezes, you no longer need to manually reboot the Pi by unplugging it and plugging it back in.
Nevertheless, it seems necessary to test whether the pulse stops properly when there is error processing, or whether there is any conflicting processing. Be sure not to rely too heavily on the watchdog. It should be used sort of like an “insurance”.
 Raspberry Pi Camera: Mini Fixed Point Camera Using Raspberry Pi Zero V1.3 & Camera Module
 The Sense HAT Add-On Board For Raspberry Pi – Operating The LED Display
 DIY Smart Picture Frame & Calendar Using Raspberry Pi 3 – PART 1
 DIY Facial Recognition With Raspberry Pi
 DIY Tip: How to Set Up Your Raspberry Pi