![]()
Click here to read Part 2 of this series >
In this 3rd tutorial of our Raspberry Pi WebIOPi series, we’re going to add more functionality, such as a function to process input by passing values to WebIOPi from a browser, to the LED Button Screen we created last time in WebIOPi IOT Part 2 – Making a flashing LED button.
Now that I have some experience programming for WebIOPi, I’m going to take it a step further to challenge myself and customize both CSS and Python using the tutorial source code as a foundation. The more I practice and write code on my own, the better I become!
This tutorial is a continuation of the Framework basis tutorial we covered in Part 2. We were introduced to customization that let us automatically turn the LED on or off from the browser. We’ll go through the same wiring process. Let’s go ahead and wire up the LED to GPIO17 (Pin 11).

Figure 1
The source code is the same as the last time, so I’m going to only list the additional (new) parts. You can overwrite the previous file inWebIOPi IOT Part 2 – Making a flashing LED button and you’ll still be able to use the following codes. If you want to change the file name, however, make sure you also change the path of the configuration file (/etc/webiopi/config).
First let’s go ahead and run the code! The complete source code that includes the changes is available below. We’ll go over the changes soon after.
|
1 2 3 4 5 6 7 8 9 10 11 12 13 14 15 16 17 18 19 20 21 22 23 24 25 26 27 28 29 30 31 32 33 34 35 36 37 38 39 40 41 42 43 44 45 46 47 48 49 50 51 52 53 54 55 |
script.py import webiopi import datetime GPIO = webiopi.GPIO LIGHT = 17 # GPIO pin using BCM numbering HOUR_ON = 8 # Turn Light ON at 08:00 HOUR_OFF = 18 # Turn Light OFF at 18:00 # setup function is automatically called at WebIOPi startup def setup(): # set the GPIO used by the light to output GPIO.setFunction(LIGHT, GPIO.OUT) # retrieve current datetime now = datetime.datetime.now() # test if we are between ON time and turn the light ON if ((now.hour >= HOUR_ON) and (now.hour < HOUR_OFF)): GPIO.digitalWrite(LIGHT, GPIO.HIGH) # loop function is repeatedly called by WebIOPi def loop(): # retrieve current datetime now = datetime.datetime.now() # toggle light ON all days at the correct time if ((now.hour == HOUR_ON) and (now.minute == 0) and (now.second == 0)): if (GPIO.digitalRead(LIGHT) == GPIO.LOW): GPIO.digitalWrite(LIGHT, GPIO.HIGH) # toggle light OFF if ((now.hour == HOUR_OFF) and (now.minute == 0) and (now.second == 0)): if (GPIO.digitalRead(LIGHT) == GPIO.HIGH): GPIO.digitalWrite(LIGHT, GPIO.LOW) # gives CPU some time before looping again webiopi.sleep(1) # destroy function is called at WebIOPi shutdown def destroy(): GPIO.digitalWrite(LIGHT, GPIO.LOW) @webiopi.macro def getLightHours(): return "%d;%d" % (HOUR_ON, HOUR_OFF) @webiopi.macro def setLightHours(on, off): global HOUR_ON, HOUR_OFF HOUR_ON = int(on) HOUR_OFF = int(off) return getLightHours() |
index.html
|
1 2 3 |
WebIOPi | Light Control<script src="/webiopi.js" type="text/javascript"></script><script type="text/javascript">// <![CDATA[ webiopi().ready(function() { // Following function will process data received from set/getLightHours macro. var updateLightHours = function(macro, args, response) { var hours = response.split(";"); // Following lines use jQuery functions $("#inputOn").val(hours[0]); $("#inputOff").val(hours[1]); } // Immediately call getLightHours macro to update the UI with current values // "getLightHours" refers to macro name // [] is an empty array, because getLightHours macro does not take any argument // updateLightHours is the callback function, defined above webiopi().callMacro("getLightHours", [], updateLightHours); // Create a button to call setLightHours macro var sendButton = webiopi().createButton("sendButton", "Send", function() { // Arguments sent to the macro var hours = [$("#inputOn").val(), $("#inputOff").val()]; // Call the macro webiopi().callMacro("setLightHours", hours, updateLightHours); }); // Append the button to the controls box using a jQuery function $("#controls").append(sendButton); // Create a "Light" labeled button for GPIO 17 var button = webiopi().createGPIOButton(17, "Light"); // Append the button to the controls box $("#controls").append(button); // Refresh GPIO buttons // pass true to refresh repeatedly of false to refresh once webiopi().refreshGPIO(true); }); // ]]></script> |
|
1 |
When you’re ready, enter run command. You can use the normal run command, but I recommend running in debug mode the first time to make sure that you don’t get any errors.
Command to run in debug mode:
sudo webiopi -d -c /etc/webiopi/config

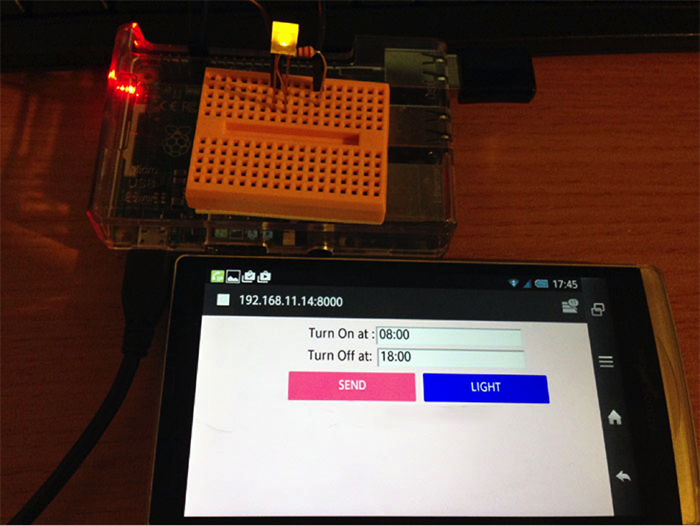
Figure 2
After running the code, go to http://raspberrypi:8000 (or your IP address), and you’ll see a screen shown in Figure 2. As you can see, 2 text boxes and a “Send” button have been added to the screen. In the previous tutorial, we automatically turned on the LED at 8 am and off at 6 pm. This time, we made modification so we can manually set turn on/off time.
“Turn On at” and “Turn Off at” indicate the time the LED turns on or off, respectively. Therefore, the LED will turn on at 8am and it will turn off at 6pm. You can change the setting of the turn-on/off time by clicking the “Send” button.
The “minute” and “second” values have been hardcoded to 0 in the source code.
Let’s look at the Python source code. The following 10 lines are the additional parts to the source code:
|
1 2 3 4 5 6 7 8 9 10 |
@webiopi.macro def getLightHours(): return "%d;%d" % (HOUR_ON, HOUR_OFF) @webiopi.macro def setLightHours(on, off): global HOUR_ON, HOUR_OFF HOUR_ON = int(on) HOUR_OFF = int(off) return getLightHours() |
One thing to note here is the “@webiopi.macro” in line 1 and line 5. In Python, a line beginning with “@” is called a “decorator”.
[A] decorator is a function that takes another function and extends the behavior of the latter function
In order to create a function that can be called from a browser, a function is placed after this “@webiopi.macro”. These two functions, “getLightHours” and “setLightHours,” are defined here. Both process the values stored in “HOUR_ON” and “HOUR_OFF.”
“setLightHours” in line 6 is a function that sets the values for “HOUR_ON” and “HOUR_OFF.” They’re declared as “global” in line 7.
Global variables (global) – Python Course
The values (on, off) passed as arguments to “setLightHours” are assigned to the variables “HOUR_ON” and “HOUR_OFF.” The function “getLightHours” in Line 2 is called.
“getLightHours” in line 2 returns the two values “HOUR_ON” and “HOUR_OFF.” These two values are passed with a semicolon (separator) between them.
|
3 |
return "%d;%d" % (HOUR_ON, HOUR_OFF) |
We’ll discuss this more later but this function passes these variables to HTML.
Next, we’re going to look at the contents of the HTML file that calls the following functions:
|
1 2 |
One | Turn On at :<input id="inputOn" type="text" /> Two | Turn Off at: <input id="inputOff" type="text" /> |
In reference to the first block of HTML, the two new text boxes added to the screen in this tutorial are used when you input the values of “HOUR_ON” and “HOUR_OFF.”
Now the JavaScript. The following source code has been added.
|
1 2 3 4 5 6 7 8 9 10 11 12 13 14 15 16 17 18 19 20 21 22 23 24 25 26 27 28 29 30 31 32 33 34 35 36 37 |
webiopi().ready(function() { // Following function will process data received from set/getLightHours macro. var updateLightHours = function(macro, args, response) { var hours = response.split(";"); // Following lines use jQuery functions $("#inputOn").val(hours[0]); $("#inputOff").val(hours[1]); } // Immediately call getLightHours macro to update the UI with current values // "getLightHours" refers to macro name // [] is an empty array, because getLightHours macro does not take any argument // updateLightHours is the callback function, defined above webiopi().callMacro("getLightHours", [], updateLightHours); // Create a button to call setLightHours macro var sendButton = webiopi().createButton("sendButton", "Send", function() { // Arguments sent to the macro var hours = [$("#inputOn").val(), $("#inputOff").val()]; // Call the macro webiopi().callMacro("setLightHours", hours, updateLightHours); }); // Append the button to the controls box using a jQuery function $("#controls").append(sendButton); // Create a "Light" labeled button for GPIO 17 var button = webiopi().createGPIOButton(17, "Light"); // Append the button to the controls box $("#controls").append(button); // Refresh GPIO buttons // pass true to refresh repeatedly of false to refresh once webiopi().refreshGPIO(true); }); |
Just like last time, let’s review WebIOPi JavaScript documentation.
First, let’s look at the “createButton” function in line 17.
|
17 |
var sendButton = webiopi().createButton("sendButton", "Send", function() { ... } |
createButton
WebIOPi.createButton(id, label[, mousedown[, mouseup]])
Returns a simple button without predefined behavior.
(string) id : id of the button to create
(string) label : label of the button
(function) mousedown (optional) : function called on mousedown/click event
(function) mouseup (optional) : function called on mouseup event
We can create a button using the createButton function. Unlike createGPIOButton in line 28, it’s a button that can define event on its own.
The first argument is the button ID and the second is the text in the button label. The actual HTML generated by this code is as follows:
|
1 |
<button id="sendButton" class="Default" type="button">Send</button> |
The third argument, the event of clicking the button (mouse down), can be configured as a function. This “Send’ button is called inside the function in line 21 as the Python function “setLightHours.”
|
21 |
webiopi().callMacro("setLightHours", hours, updateLightHours); |
callMacro
WebIOPi.callMacro(macro, [args[, callback]])
Call a macro on the server.
(string) macro : name of the macro to call
(string) arg (optional) : array containing arguments
(function) callback (optional) : function called when result received from the server
The first argument is the function name in the Python file. The second argument is the array of arguments passed to the Python function. The third argument is the JavaScript “callback” function.
As mentioned above, the Python “setLightHours” function sets the values for “HOUR_ON” and “HOUR_OFF.” When “getLightHours” is called at the end of “setLightHours,” the current values for “HOUR_ON” and “HOUR_OFF” are returned. When these values are passed to the JavaScript, they are passed to the callback function “updateLightHours.”
|
3 |
var updateLightHours = function(macro, args, response) {...} |
“updateLightHours”, the callback function described in the callMacro documentation above, takes 3 arguments. The first and the second arguments are the first two arguments passed from the caller function “callMacro”. They are passed to updateLightHours as is. The third argument contains the value returned by the response function (setLightHours in this case).

Figure 3
Above is a simple diagram of the flow of the code. createButton creates a button that already has this event defined.
Since you can only set the hour for LED turn on/off time in the sample program, I tried to customize it so you can also include minutes. Please refer to this page for details on Python date manipulation.
script.py
|
1 2 3 4 5 6 7 8 9 10 11 12 13 14 15 16 17 18 19 20 21 22 23 24 25 26 27 28 29 30 31 32 33 34 35 36 37 38 39 40 41 42 43 44 45 46 47 48 49 50 51 52 53 54 |
import webiopi import datetime GPIO = webiopi.GPIO LIGHT = 17 # GPIO17 HOUR_ON = datetime.time(8,0) # Automatic LED switch on time 8:00 HOUR_OFF = datetime.time(18,0) # Automatic LED switch off time 8:00 def setup(): # Set GPIO17 to OUT GPIO.setFunction(LIGHT, GPIO.OUT) # Get the current time now = datetime.time(datetime.datetime.now().hour, datetime.datetime.now().minute) # Compare the current time to the automatic switch on/switch off times if ((now >= HOUR_ON ) and (now < HOUR_OFF)): GPIO.digitalWrite(LIGHT, GPIO.HIGH) def loop(): # Get the current time now = datetime.time(datetime.datetime.now().hour, datetime.datetime.now().minute) # Automatically switch on LED if ((now.hour == HOUR_ON.hour) and (now.minute == HOUR_ON.minute) and (now.second == 0)): if (GPIO.digitalRead(LIGHT) == GPIO.LOW): GPIO.digitalWrite(LIGHT, GPIO.HIGH) # Automatically switch off LED if ((now.hour == HOUR_OFF.hour) and (now.minute == HOUR_OFF.minute) and (now.second == 0)): if (GPIO.digitalRead(LIGHT) == GPIO.HIGH): GPIO.digitalWrite(LIGHT, GPIO.LOW) # Repeat every 1 second webiopi.sleep(1) def destroy(): # Switch off LED GPIO.digitalWrite(LIGHT, GPIO.LOW) @webiopi.macro def getLightHours(): return "%s;%s" % (HOUR_ON.strftime("%H:%M"),HOUR_OFF.strftime("%H:%M")) @webiopi.macro def setLightHours(on, off): global HOUR_ON, HOUR_OFF # Partition out arguments array_on = on.split(":") array_off = off.split(":") # Setting values HOUR_ON = datetime.time(int(array_on[0]),int(array_on[1])) HOUR_OFF = datetime.time(int(array_off[0]),int(array_off[1])) return getLightHours() |
For HTML, we can use the tutorial file without making any modifications.
As shown in the video, I set the time for “Turn Out at” to 19:38 and pressed Send button. You can see that LED turns off a few seconds before the time hits 19:38. As soon as LED turns off, the color of the “LIGHT” button changes from blue to black. The variance appears to be due to the fact that WebIOPi is using Raspberry Pi’s internal clock to track time. There was about 5 second deviation.

Figure 4
I also tried modified CSS to change the look of the page.
It’s not declared in the HTML file but in a CSS file called “webiopi.css” which loads automatically. Please note that each component has an id called “#update” available in addition to its attributes.
For components written in JavaScript, I was able to use the addClass function to assign a class. However, the button created by “createGPIOButton” was an exception since the class values are overwritten each time it switches between ON/OFF, I wasn’t able to apply a style to it.
The CSS file can be externalized. Just like the HTML file, it just needs to be placed in the document root folder declared in the configuration file.
In the next tutorial, we’re going to further expand the concept of input/out and work on a very fun Christmas project! Taking advantage of what we’ve learned so far, we’re going to explore full-color LED control in WebIOPi.
 Raspberry Pi WebIOPi IOT Part 2 – Making a flashing LED button
 Raspberry Pi WebIOPi IOT – Full-Color LED Christmas Decoration
 How to integrate an RFID module with Raspberry Pi
 DIY Tip: How to Set Up Your Raspberry Pi
 The Sense HAT Add-On Board For Raspberry Pi – Operating The LED Display
 Raspberry Pi WebIOPi IOT, Programming Analog Input


