![]()

With several parts and shields available, I think that Arduino is clearly a very stand alone device for development. Taking it one step further this time, I’d like to test a method for Arduino to communicate with an external application called OSC. By communicating with external applications and electronic parts like switches and volume, you’ll be able to control them on screen visually and further expand your expression abilities!
Expected time to complete: 90 minutes
Parts needed:
What kind of communication method is OSC? Here’s what we found on Wikipedia.
Open Sound Control – Wikipedia
Open Sound Control (OSC) is a protocol for networking sound synthesizers, computers, and other multimedia devices for purposes such as musical performance or Show control. Bringing the benefits of modern networking technology to the world of electronic musical instruments, OSC’s advantages include interoperability, accuracy, flexibility, and enhanced organization and documentation.
So, why should we use OSC communication with Arduino even if we aren’t dealing with music? Because of its flexibility, there are many cases where we can use OSC besides music. Moreover, it’s used in many different kinds of software.
Let’s see how OSC works. OSC has a very simple structure. OSC has two kinds of messages, and communication is done by exchanging them with other applications.

Figure 1. OSC communication method
To use OSC on an Arduino, you need to have a network. So, you’ll use an ethernet shield.

Picture 1. Arduino Ethernet shield
Also, you will need a library in order to use OSC communication on Arduino. There are several libraries you can use for OSC on Arduino, but for now we will use ArdOSC (there is a possibility it won’t work correctly with a recent version of Arduino, so please use a different OSC library in that case). After adding a library, write the following transmission program (refer to the previous instructions on how to add a library).
OSC transmission test program
|
1 2 3 4 5 6 7 8 9 10 11 12 13 14 15 16 17 18 19 20 21 22 23 24 25 |
#include #include #include byte myMac[] = { 0xXX, 0xXX, 0xXX, 0xXX, 0xXX, 0xXX }; //enter the ethernet address of the mac byte myIp[] = { 192, 168, 0, 9 }; //enter the IP address assigned to the Arduino int destPort=12000; //the receiving port number byte destIp[] = { 192, 168, 0, 2 }; //the receiving IP address OSCClient client; OSCMessage global_mes; void setup(){ Ethernet.begin(myMac ,myIp); //internet settings } void loop(){ global_mes.setAddress(destIp,destPort); //sending settings global_mes.beginMessage("/temperature"); //Message global_mes.addArgString("29.0"); //Argument client.send(&global_mes); //data sending global_mes.flush(); //data clear delay(500); } |
Once Arduino has been set up, we’ll set up the application. We’ll use Processing for the external application this time. Processing is an open source programming language for media art and visual design. You could say it’s a language, specialized for graphics, which can be easily handled by beginners much like Arduino. Select “Download Processing” on the Processing website to download and install it.

Figure 2. Processing website
Once Processing has finished installing, open it.

Figure 3. Processing icon

Figure 4. Processing startup screen
Once you have opened it, a screen similar to Arduino’s will be displayed. Like Arduino, in the center, you can find buttons to start and stop a program. The example sketch and way to use the library are mostly the same as Arduino’s, so I think you’ll be able to use it without any problem.
OSC receiving program (Processing)
|
1 2 3 4 5 6 7 8 9 10 11 12 13 14 15 16 17 18 19 20 21 |
import oscP5.*; import netP5.*; OscP5 oscP5; NetAddress myRemoteLocation; void setup() { size(500,500); frameRate(25); oscP5 = new OscP5(this,12000); //the settings of the receiving port myRemoteLocation = new NetAddress("127.0.0.1",12001); //the sending IP and port in case of sending } void draw() { background(0); } //OSC void oscEvent(OscMessage theOscMessage) { theOscMessage.print(); } |
Once you launch Processing, if you see a message displayed in the console at the bottom describing Processing when starting Arduino, it means that you’ve succeeded.

Figure 5. The results of launching Processing
Let’s try sending information from Arduino’s temperature measurements to an external application using OSC communication.
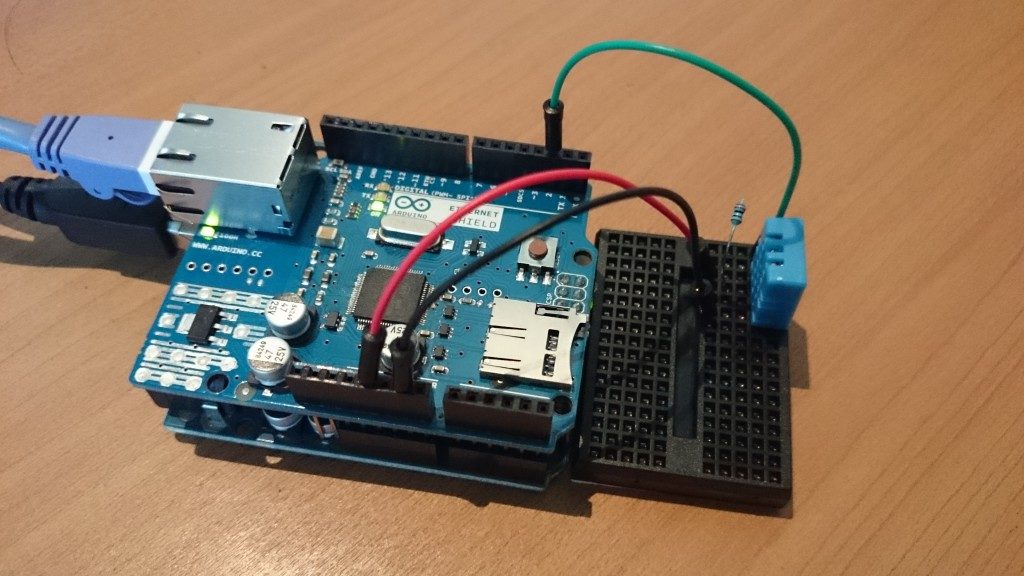
We’ll use DHT11 for measuring temperature and humidity.
DHT11 is already in the Arduino’s library, so I’ll add DHT11’s library.

Picture 2. DHT11 temperature and humidity sensor
There is a sample in DHT11’s library, so you can use it to see if DHT11 is measuring correctly or not.

Figure 6. Temperature and humidity sensor circuit
Temperature and humidity measuring program
|
1 2 3 4 5 6 7 8 9 10 11 12 13 14 15 16 17 18 19 20 21 22 23 24 25 26 27 28 29 30 31 32 33 34 35 36 37 38 39 40 41 |
#include "DHT.h" #define DHTPIN 2 #define DHTTYPE DHT11 // DHT 11 DHT dht(DHTPIN, DHTTYPE); void setup() { Serial.begin(9600); Serial.println("DHT11"); dht.begin(); } void loop() { delay(2000); float h = dht.readHumidity(); float t = dht.readTemperature(); float f = dht.readTemperature(true); if (isnan(h) || isnan(t) || isnan(f)) { Serial.println("Failed to read from DHT sensor!"); return; } float hif = dht.computeHeatIndex(f, h); float hic = dht.computeHeatIndex(t, h, false); Serial.print("Humidity: "); Serial.print(h); Serial.print(" %t"); Serial.print("Temperature: "); Serial.print(t); Serial.print(" *C "); Serial.print(f); Serial.print(" *Ft"); Serial.print("Heat index: "); Serial.print(hic); Serial.print(" *C "); Serial.print(hif); Serial.println(" *F"); } |

Figure 7. Results of implementation
If it’s measuring correctly, let’s alter the program to use it with OSC communication.
Temperature and humidity OSC communication program
|
1 2 3 4 5 6 7 8 9 10 11 12 13 14 15 16 17 18 19 20 21 22 23 24 25 26 27 28 29 30 31 32 33 34 35 36 37 38 39 40 41 42 43 44 45 46 47 48 49 50 51 52 53 54 55 56 |
#include <SPI.h> #include <Ethernet.h> #include <ArdOSC.h> #include "DHT.h" #define DHTPIN 2 #define DHTTYPE DHT11 // DHT 11 DHT dht(DHTPIN, DHTTYPE); byte myMac[] = { 0xXX, 0xXX, 0xXX, 0xXX, 0xXX, 0xXX }; byte myIp[] = { 192, 168, 0, 9 }; int destPort=12000; byte destIp[] = { 192,168,0,10 }; OSCClient client; OSCMessage global_mes; void setup(){ Ethernet.begin(myMac ,myIp); dht.begin(); } void loop(){ delay(2000); float h = dht.readHumidity(); float t = dht.readTemperature(); float f = dht.readTemperature(true); if (isnan(h) || isnan(t) || isnan(f)) { Serial.println("Failed to read from DHT sensor!"); return; } // float hif = dht.computeHeatIndex(f, h); // float hic = dht.computeHeatIndex(t, h, false); global_mes.setAddress(destIp,destPort); //Send temperature global_mes.beginMessage("/temperature"); global_mes.addArgFloat(t); client.send(&global_mes); global_mes.flush(); //object data clear delay(5000); //Send humidity global_mes.flush(); //object data clear global_mes.setAddress(destIp,destPort); global_mes.beginMessage("/humidity"); global_mes.addArgFloat(h); client.send(&global_mes); delay(1000); global_mes.flush(); //object data clear } |
Receiver program (Processing)
|
1 2 3 4 5 6 7 8 9 10 11 12 13 14 15 16 17 18 19 20 21 22 23 24 25 26 27 28 29 30 31 32 33 34 35 36 |
import oscP5.*; import netP5.*; OscP5 oscP5; NetAddress myRemoteLocation; void setup() { size(500,500); frameRate(25); oscP5 = new OscP5(this,12000); myRemoteLocation = new NetAddress("127.0.0.1",12001); } String str1 = ""; String str2 = ""; float val = 0; void draw() { background(0); fill(256,256,256); text(str1,50,20); text(str2,50,40); fill(val,256,256); rect(20,10,20,32); } //OSC void oscEvent(OscMessage theOscMessage) { /* print the address pattern and the typetag of the received OscMessage */ print("### received an osc message."); theOscMessage.print(); str1 = "OSC Message : "+theOscMessage.addrPattern(); str2 = "OSC Arguments : "+theOscMessage.get(0).floatValue(); val = theOscMessage.get(0).floatValue(); } |
When launching both programs, if the temperature and humidity are displayed repeatedly under the Processing display, you’ve succeeded.

Figure 8. OSC communication launch results
This time, I introduced one method to make an Arduino communicate with an external application. There are unique applications that let you choose a protocol and communicate even without using OSC communication. But by using OSC, you can connect to a large number of different software. Next time, I’d like to show you a wider usage of Arduino by developing the basics we’ve learned about OSC communication.
 Linking Arduino to another Application with OSC Communication Part 2 – Making a Rhythm Machine with Sonic Pi
 Using Arduino with Parts and Sensors – Speakers Part 2
 USB Volume Control with Arduino
 Using Sensors with the Arduino: Create a Simple Device to Detect Movement and React
 Make a Stevenson Screen with Arduino Part 2 – Display Numerical Values on an Electronic Scoreboard (7 segment LED)
 Arduino Long Range Communication Tutorial – LoRenz Shield